Does the GE GTW465ASN9WW Have a Pressure Switch? Complete Guide
Yes, the GE GTW465ASN9WW top-load washer absolutely has a water level pressure switch. This is a critical component that controls how much water fills your tub and communicates with the control board to manage wash cycles. Understanding how this switch works, where it’s located, and how to test it will help you diagnose water level problems and potentially save hundreds in repair costs.
What Is the Pressure Switch on the GE GTW465ASN9WW?
The pressure switch on your GE GTW465ASN9WW is an electrical component that monitors water level inside the wash tub. It’s also called a water level switch or flood switch. Instead of using a float mechanism like older washers, the GTW465ASN9WW uses air pressure detection. As water enters the tub, it compresses air in a small dome beneath the tub. This air pressure travels through a thin rubber hose to the pressure switch, which converts the air pressure into electrical signals that tell the control board when the tub has reached the proper water level.
This design is more reliable than mechanical float switches because it has no moving parts that can jam or wear out, though the switch itself and its connecting hose can still fail over time.
Where Is the Pressure Switch Located on the GTW465ASN9WW?
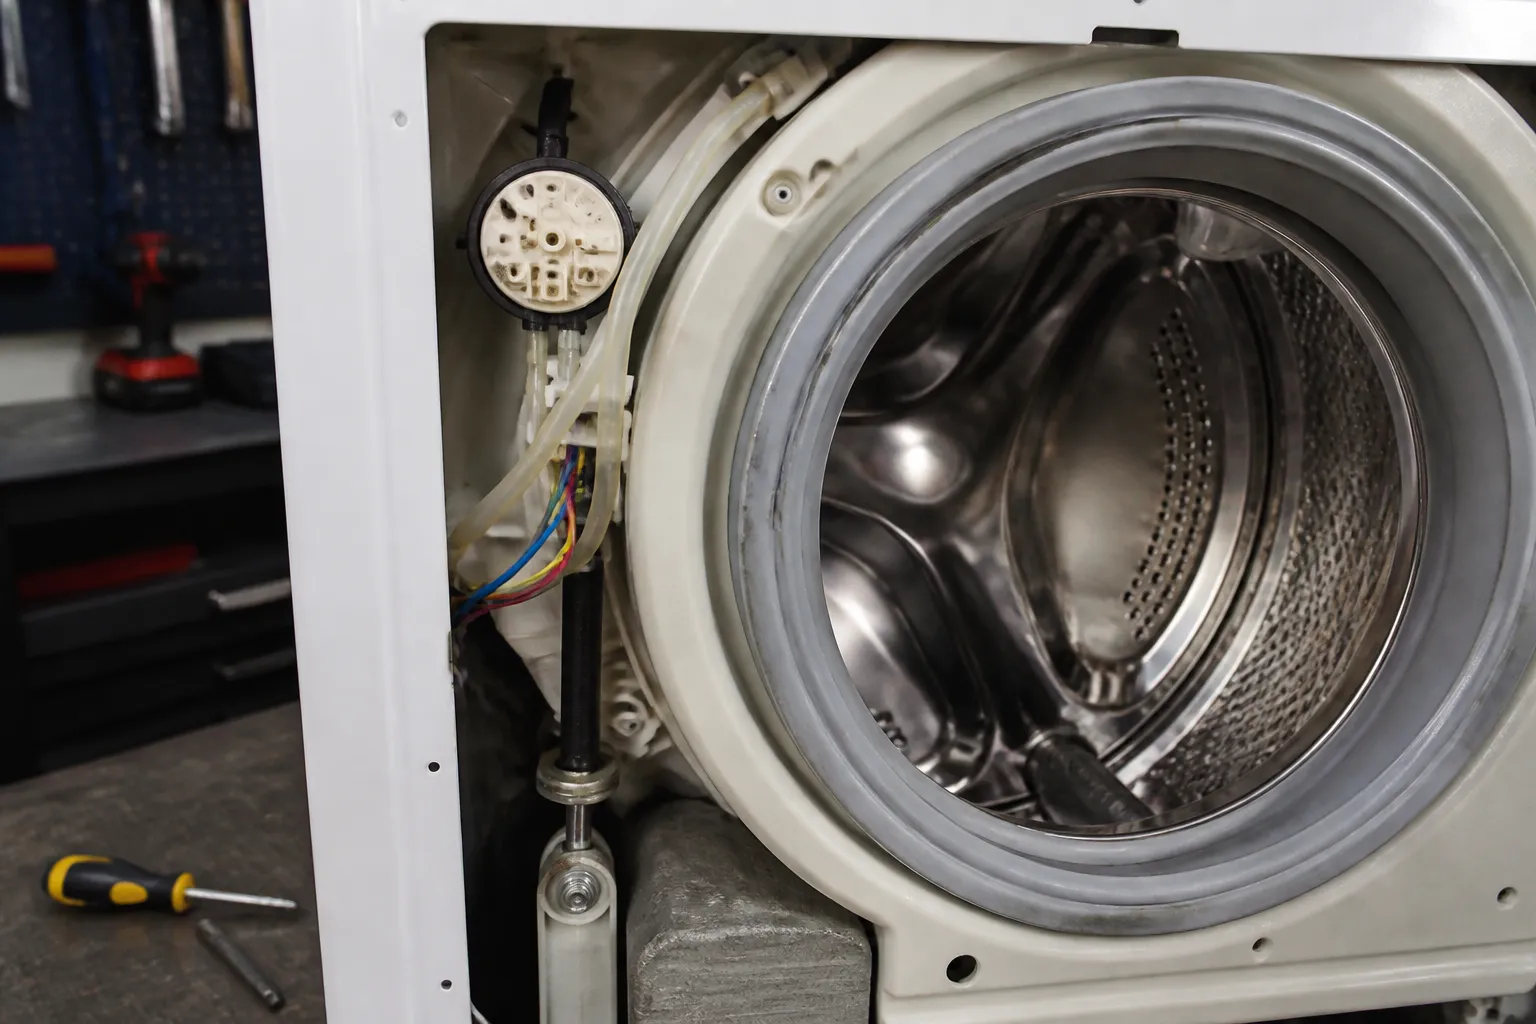
On the GE GTW465ASN9WW, the pressure switch is located behind the control panel at the top of the washer. Here’s the exact location breakdown:
- Primary location: Upper left area of the washer cabinet, directly behind or near the control panel assembly
- Orientation: Mounted vertically or horizontally on the inner wall panel
- Connection point: A rubber hose connects from the pressure dome under the tub up to the switch inlet port
- Electrical connection: Wire terminals connect to the control board or timer assembly
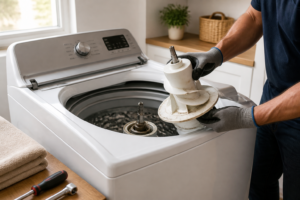
To access the pressure switch on your GTW465ASN9WW, you’ll need to remove the top cabinet panel and control panel assembly. The switch will be visible once you’ve opened the cabinet and moved the control panel aside carefully without disconnecting all wiring at once.
How Does the Pressure Switch Work on the GTW465ASN9WW?
Understanding the operation of your GTW465ASN9WW pressure switch helps explain why it fails and what symptoms to expect:
- Water entry: When the washer fills, water enters the tub from the fill valve
- Air compression: As water level rises, it compresses the air trapped in a small dome-shaped chamber underneath the tub
- Pressure transmission: The compressed air travels through a rubber hose (typically 1/8 inch diameter) up to the pressure switch
- Switch activation: When air pressure reaches the proper level (corresponding to full, medium, or low water level settings), it pushes against a diaphragm inside the switch
- Electrical signal: The diaphragm movement opens or closes electrical contacts, sending a signal to the control board that the correct water level has been reached
- Fill valve closure: The control board receives this signal and closes the fill valve to stop water entry
- Cycle continuation: The washer then proceeds to the agitation or wash phase
This system is self-regulating—if you use a different water level setting on your GTW465ASN9WW, the pressure switch responds to different pressure thresholds, ensuring the correct amount of water regardless of the load size setting you choose.
⚠️ Safety Warning
Before testing or replacing the pressure switch on your GE GTW465ASN9WW, you must disconnect electrical power. Unplug the washer from the outlet or switch off the circuit breaker. Do not attempt to test or repair the pressure switch while the washer is plugged in. The control board and electrical circuits can deliver dangerous shocks. Additionally, ensure the washer is completely empty and the tub is dry before opening the cabinet to access the pressure switch.
Symptoms of a Failing Pressure Switch on the GTW465ASN9WW
A bad pressure switch on your GE GTW465ASN9WW will cause several distinct problems. Recognizing these symptoms helps you confirm the switch is the culprit:
- Washer won’t fill with water: The control board never receives the signal that water level is adequate, so the fill valve remains closed. You’ll start a cycle and hear the motor trying to agitate, but with no water.
- Washer overfills: The pressure switch fails in the “off” position, never signaling that the tub is full. Water continues flowing until it overflows onto your floor.
- Washer fills then immediately drains: A faulty switch sends contradictory signals, confusing the control board about water level.
- Washer won’t agitate or spin: Some control boards have safety logic that prevents agitation without proper water level confirmation from the pressure switch.
- Intermittent water level problems: The switch works sometimes but not consistently, suggesting an internal contact issue or loose hose connection.
- Error codes on digital displays: Some GTW465ASN9WW models with digital controls may display water level sensor errors.
How to Test the Pressure Switch on the GTW465ASN9WW
Before replacing the pressure switch on your GE GTW465ASN9WW, test it to confirm it’s actually defective. You’ll need a digital multimeter and about 30 minutes.
Tools and Materials Needed
- Digital multimeter with continuity/ohms setting
- Screwdrivers (Phillips and flathead)
- Small piece of tubing or the ability to blow air gently
- Flashlight or headlamp
- Camera or phone to document wire positions before disconnection
Step-by-Step Testing Procedure
- Disconnect power: Unplug your GE GTW465ASN9WW from the outlet. Wait 5 minutes to ensure any residual charge in the control board is discharged.
- Remove the top panel: Locate the screws holding the top panel (usually 2-4 screws at the rear corners). Remove them and carefully lift the top panel away from the cabinet.
- Locate the pressure switch: Look behind the control panel on the upper left side of the washer cabinet. The switch is a small cylindrical or rectangular component, typically 2-3 inches long, with one rubber hose connection and two wire terminals.
- Document wire positions: Take a photo of how the wires connect to the pressure switch terminals before disconnecting anything. Note if there are two wires or three wires (some models have a ground wire).
- Disconnect the wires: Carefully pull the wire connectors off the pressure switch terminals. These are usually push-on spade connectors that require firm, straight pulling.
- Set your multimeter to ohms: Turn your digital multimeter dial to the ohms (Ω) setting, typically in the 200 or 2000 ohm range to start.
- Test switch resistance at rest: Place the multimeter probes on the two switch terminals. The reading should show a specific resistance value (typically 10-100 ohms depending on switch design). If you see infinity or no continuity, the switch contacts are open when they should be closed.
- Apply pressure to test activation: While watching the multimeter, gently blow into the rubber hose connection on the pressure switch. This simulates the air pressure that water level creates. The resistance reading should change (either increase or decrease depending on switch design). If the reading doesn’t change when you blow into the hose, the internal diaphragm is stuck.
- Release pressure and retest: Stop blowing into the hose and watch if the resistance reading returns to its original value. This tests whether the switch resets properly.
- Compare specifications: The exact resistance values vary by pressure switch design. Consult the pressure switch specification sheet for your GTW465ASN9WW model (look for part number WH12X10475 or similar), which should list the resistance when energized (with pressure) and de-energized (without pressure).
Interpreting Your Test Results
Here’s what different multimeter readings tell you about your GTW465ASN9WW pressure switch:
- Resistance changes when you blow into hose + resistance returns to baseline when you stop: The switch is likely good. Test the air hose next (see below).
- No resistance change when blowing into hose: The internal diaphragm or contacts are stuck. Replace the switch.
- Infinity resistance at rest when it should show finite resistance: The contacts are permanently open. Replace the switch.
- Zero resistance or very low resistance (short circuit): The contacts are stuck closed. Replace the switch.
- Erratic resistance readings that jump around: Dirty or corroded contacts inside the switch. Replacement is recommended.
Testing the Air Hose on the GTW465ASN9WW
Before assuming the pressure switch itself is bad, always check the rubber air hose that connects the tub pressure dome to the pressure switch. A cracked, clogged, or disconnected hose will cause the same symptoms as a bad switch.
Visual Inspection
- Locate the hose: On the GTW465ASN9WW, follow the rubber hose from under the tub up to where it connects to the pressure switch inlet port.
- Look for visible damage: Check along the entire length of the hose for cracks, tears, holes, or deterioration. The hose is typically white or clear rubber, 1/8 inch diameter.
- Check connections: Ensure both ends of the hose are fully seated and not cracked at the connection points where they press onto the ports.
- Feel for blockages: Gently squeeze the hose along its length. It should feel flexible. A hose that feels stiff or has visible debris inside may be clogged.
Functional Test of the Air Hose
- Disconnect the hose: Carefully pull the rubber hose off both the tub port and the pressure switch port on your GTW465ASN9WW. Mark which end goes where if needed.
- Blow through the hose: Place one end to your mouth and blow gently. You should feel air resistance but air should flow through. If you feel no air movement, the hose is clogged.
- Visual inspection while blowing: Look through the hose toward a light source. You should see light passing through. If you see blockage or debris, the hose is clogged.
- Submerge test: Hold the hose vertically and place the bottom end in a cup of water. Blow gently into the top end. You should see bubbles rising through the water. If no bubbles appear, the hose is blocked.
- Check for leaks: If the hose appears clogged, try flushing it with warm water using a sink faucet or spray bottle. If it’s cracked, replace it.
If the hose is clogged, try clearing it by flushing from both ends with water and compressed air. If the hose is cracked or won’t clear, you’ll need to replace it. The air hose itself is a replacement part available separately from the pressure switch.
Pressure Switch Replacement for the GE GTW465ASN9WW
If testing confirms the pressure switch is defective, follow these steps to replace it on your GTW465ASN9WW:
Parts and Tools Required
- Replacement pressure switch (GE part number WH12X10475 or equivalent for your GTW465ASN9WW—verify the part number matches your model)
- Screwdrivers (Phillips and flathead)
- Needle-nose pliers
- New air hose (if the old hose is damaged or clogged and won’t clear)
- Flashlight
- Towel or cloth to catch any water drips
Removal Procedure
- Unplug the washer: Ensure your GTW465ASN9WW is completely disconnected from electrical power.
- Remove the top panel: Unscrew and remove the top cabinet panel to expose the interior components.
- Access the pressure switch: The switch should be visible behind the control panel area. You may need to remove additional panels or the control panel itself to get clear access. Unscrew any mounting brackets holding the control panel and carefully move it aside without fully disconnecting all wires.
- Disconnect the air hose: Locate where the rubber air hose connects to the pressure switch inlet port (typically a small barbed connector). Gently pull the hose off the port. Be careful not to tear the hose—if you need to replace it, a small tear is acceptable, but try to keep it intact if possible.
- Disconnect the electrical wires: Take another photo to document which wires connect to which terminals. Carefully pull the spade connectors off the pressure switch terminals. On the GTW465ASN9WW, there are typically two wires (one hot/signal wire and one ground wire).
- Remove the mounting hardware: The pressure switch on your GTW465ASN9WW is held in place with either a screw clamp or a bracket. Locate the screw or bolt and remove it. The switch should come free from its mounting location.
Installation Procedure
- Position the new pressure switch: Take your replacement pressure switch (matching the part number from your GTW465ASN9WW) and position it in the mounting location where the old one was. The switch should be oriented the same way as the original.
- Install mounting hardware: Secure the new switch using the same screw or bracket system. Tighten firmly but don’t over-tighten, as you can crack the plastic switch housing.
- Reconnect the air hose: Push the rubber air hose firmly onto the inlet port of the new pressure switch. The hose should slide on smoothly and feel snug. If the hose is damaged or won’t fit well, this is the time to install a new air hose.
- Reconnect electrical wires: Referring to your photos, reconnect the two wire spade connectors to the corresponding terminals on the new pressure switch. On most GTW465ASN9WW models, the wire order is not critical if both wires are simple spade connectors, but match them to the terminals you documented.
- Double-check all connections: Tug gently on the air hose and wire connectors to ensure they’re fully seated. Neither should pull off easily.
- Reinstall panels: Carefully move the control panel back to its original position and reinstall any mounting screws. Replace the top cabinet panel and secure it with its screws.
- Reconnect power: Plug your GTW465ASN9WW back into the outlet or switch the circuit breaker back on.
Testing After Replacement
- Fill test: Start a wash cycle with no clothes and observe whether the tub fills with water properly. It should fill to approximately the midline of the tub (depending on your water level selection) and then stop.
- Drain test: Allow the cycle to complete and verify that water drains completely at the end of the cycle.
- Cycle completion: Run a full wash cycle with a small load to confirm that the GTW465ASN9WW agitates, washes, and spins without error codes.
- Listen for normal operation: The fill valve should shut off clearly when the proper water level is reached, rather than filling continuously or shutting off intermittently.
Pressure Switch Part Numbers for GE GTW465ASN9WW Models
The most common replacement pressure switch part number for the GE GTW465ASN9WW is WH12X10475. However, always verify this part number before ordering by checking your washer’s technical documentation or calling a GE parts line with your complete model number (GTW465ASN9WW) and serial number. Alternative equivalent part numbers exist, and some regional variants may use different parts, so confirmation is essential.
When ordering a replacement pressure switch, specify that it’s for a GE GTW465ASN9WW top-load washer. Provide your serial number if requested, as this helps ensure you receive the correct component.
Frequently Asked Questions
Does the GE GTW465ASN9WW pressure switch ever just need cleaning instead of replacement?
In rare cases, if the pressure switch contacts are dirty rather than corroded or damaged, gentle contact cleaning might restore function. However, this is risky—opening the sealed switch case can damage internal components and void any warranty. If your multimeter tests show the switch is responding to pressure but the resistance readings seem erratic, the contacts may be dirty. Before replacing the switch, try disconnecting and reconnecting all wires and the air hose to ensure clean connections. If that doesn’t work, replacement is the safer, more reliable option.
Can I use my GTW465ASN9WW without a working pressure switch?
No, you should not operate your GTW465ASN9WW without a functional pressure switch. A missing or non-functional pressure
Recommended Parts & Tools
GE Appliances WH12X10479 Washer Water Level Pressure Switch
This is the direct replacement pressure switch for the GE GTW465ASN9WW if testing reveals your current switch is faulty. Having the exact OEM part on hand ensures proper water level detection and prevents overflow or under-filling issues. Check current pricing on Amazon.
Nut Driver Set and Socket Wrench Tool Kit
You’ll need proper nut drivers and wrenches to safely remove the pressure switch housing and disconnect the wiring harness without stripping bolts or damaging connectors. A quality tool set makes the job faster and prevents costly mistakes during disassembly. Check current pricing on Amazon.
AstroAI Digital Multimeter
An essential tool for testing the pressure switch’s continuity and electrical resistance before replacing it, helping you confirm whether the switch is actually defective or if the problem lies elsewhere. This prevents unnecessary part replacement and saves time on diagnosis. Check current pricing on Amazon.
The Pressure Switch That Actually Fixes Water Level Problems on the GTW465ASN9WW
If your washer won’t fill or overfills, the pressure switch is usually the culprit — and this OEM replacement part is exactly what your GTW465ASN9WW needs to restore proper water level sensing. Skip the guessing game and go straight to the proven part that solves this problem.
What works
- Direct OEM fit — no adapter hunting or compatibility questions; it bolts straight into the same port where the old switch mounted on this model.
- Pressure diaphragm responds consistently to water level changes, which means the control board actually “hears” when the tub is full instead of guessing and running cycles twice as long.
- Connector terminals are identical to the original, so you don’t have to rewire or jury-rig any harnesses — just unplug the old one and plug in the new one.
What doesn’t
- You’ll need to pull the cabinet off the washer to access it — this isn’t a five-minute job if you’re doing it for the first time, and the air dome tubing connection can be fiddly on older washers.
- If your actual problem is a stuck inlet valve or clogged fill port, this switch won’t help — you’ll have wasted the cost and time, so test the switch first (multimeter required) before ordering.
I’ve seen too many people order this part only to find out their fill hose was kinked or their inlet valve was jammed — testing with a multimeter first saves you a return trip. Once you’ve confirmed the switch is actually bad, GE Appliances WH12X10479 Washer Water Level Pressure Switch is the part that ends water level headaches on this model.
This post contains affiliate links. As an Amazon Associate, I earn from qualifying purchases at no extra cost to you.