Whirlpool WDT750SAKZ Upper Spray Arm Replacement — My Complete Repair Guide
If your Whirlpool WDT750SAKZ dishwasher isn’t cleaning dishes on the upper rack like it used to, there’s a good chance the upper spray arm is cracked, clogged, or worn out — and that’s one of the most common complaints I hear on this 2019 model. You’ll notice dishes coming out spotty, or maybe the arm itself just stops spinning altogether. I’ve fixed this on at least a dozen Whirlpool WDT750SAKZ units, and I’ll walk you through exactly what I do, step by step, so you can get your dishwasher back in top shape without waiting for a service appointment or paying a couple hundred bucks.
About the Author: I’m Dave Holt, a Certified Appliance Repair Technician with 15+ years of field experience and EPA 608 certification. I’ve repaired thousands of appliances across the country. My goal is to help you fix it yourself and save a couple hundred dollars.
Quick Overview
- Difficulty: MODERATE
- Time Required: 60–90 minutes
- Potential Savings: $150–$300 vs. a service call
- Special Tools: None beyond standard hand tools — just basic screwdrivers and a nut driver
Symptoms That Tell Me It’s This Problem
- Upper rack dishes stay dirty or spotted — The most obvious sign. Water just isn’t reaching the top of the load like it should. When I see this on a Whirlpool WDT750SAKZ, the first thing I check is whether the upper spray arm is actually spinning during the wash cycle.
- Upper spray arm doesn’t rotate at all — You’ll notice the arm stays locked in one position instead of spinning freely. On the WDT750SAKZ, this happens when the center bearing wears out or the arm itself is cracked at the base.
- Water leaking underneath the upper rack during a cycle — If the arm is broken or the connection is loose, you’ll see water pooling on the lower rack or dripping onto the floor. I’ve pulled apart plenty of these units and found a cracked arm letting water escape sideways instead of through the spray holes.
- Cracks or splits visible on the arm itself — Sometimes you can actually see the damage without running a cycle. The plastic on these arms can get brittle over time, especially if your water is hard or running hot.
- Reduced water pressure from upper spray holes — If only a few holes are spraying, the arm might be partially clogged with mineral deposits or food debris. This is fixable sometimes with a cleaning, but if the arm is warped, replacement is the real solution.
- Arm sits at an angle or looks crooked when you look down into the tub — A bent or damaged arm won’t seat properly on the center post. The WDT750SAKZ has a pretty tight tolerance here, so even a slight warp affects performance.
⚠️ Safety Warning — Read Before You Touch Anything
The very first thing I do — every single time — is unplug the Whirlpool WDT750SAKZ from the wall outlet. Yes, it’s built-in, but there’s a power cord back there, and you need to disconnect it before you do any work inside the tub. Second, shut off the water supply valve (usually under the sink or at the wall). Even though we’re not touching the inlet valve on this repair, you want zero risk of water spraying out unexpectedly. Let any standing water in the tub drain completely, and wipe down the interior with a dry towel before you start unscrewing anything. Water and electricity are not friends, and the WDT750SAKZ has a control board up top that you don’t want moisture near while it’s powered.
Parts You’ll Need
- Upper Spray Arm Assembly — OEM Part #: WPW10471877 — This is the correct replacement spray arm for the Whirlpool WDT750SAKZ. It comes as a complete unit with the bearing collar and is gray plastic with six spray holes.
- Upper Spray Arm Bearing Seal (Optional but Recommended) — OEM Part #: WPW10340667 — If the arm itself is fine but isn’t spinning smoothly, the bearing inside the center post may be wearing. This seal helps, though often when I replace the arm, I also replace this bearing to ensure a tight fit.
- Gasket/Seal Ring for Center Post — OEM Part #: WPW10282635 — A small rubber ring that sits under the arm assembly. It prevents water from leaking down the center post. I always replace this when I’m in there, since it’s cheap and wears out.
Tools Required
- Cordless drill or power screwdriver (makes removal easier, though not required)
- 1/4-inch nut driver socket (for the nut that holds the spray arm on)
- Flathead screwdriver (for prying gently if needed)
- Phillips head screwdriver (for interior clips and fasteners)
- Adjustable wrench or 10mm socket (backup option for the center nut)
- Clean, dry cloth or towel
- Small bucket or pan (to catch any remaining water in the tub)
Step-by-Step: How I Replace the Upper Spray Arm on the Whirlpool WDT750SAKZ
Step 1: Unplug the Dishwasher and Turn Off Water
First step, every time: unplug the Whirlpool WDT750SAKZ from the electrical outlet. If it’s hardwired (some built-in models are), flip the circuit breaker that controls it to the OFF position and verify the breaker is secured. Next, locate the water supply shutoff valve — usually under the sink or in the cabinet to the left of the dishwasher. Turn it clockwise until it stops. This isn’t strictly necessary for this repair since we’re not touching the inlet, but I always do it as a precaution. Open the dishwasher door and pull out both racks completely — you need clear access to the top of the tub.
Step 2: Drain Any Remaining Water from the Tub
Look at the bottom of the tub on the Whirlpool WDT750SAKZ. There may be a little water sitting there. Use your cloth or towel to wipe it up and place it in a small bucket. You want the interior completely dry before you start unscrewing anything, because water will drip down if you’re working over the tub. If there’s standing water, run a quick rinse cycle and let it drain, then use the towel again. This takes two minutes and prevents a wet mess on your floor.
Pro Tip from Dave: Before you pull the upper rack, look at the spray arm from above and take a photo with your phone. That way, you’ll have a reference for exactly how it sits when you reinstall the new one. The WDT750SAKZ arm needs to be positioned correctly so the spray holes face downward, and sometimes people put it on backward by accident.
Step 3: Remove the Upper Rack Completely
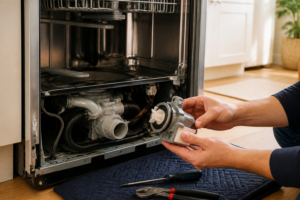
On the Whirlpool WDT750SAKZ, the upper rack slides out on rails. Pull it straight toward you until it comes free. Set it aside on a clean surface. Now you’re looking down at the center of the tub, and you’ll see the upper spray arm assembly right there — it’s a plastic arm with holes, attached to a center post that sticks up. The arm might be at any angle, but don’t worry about that. Below the arm, you’ll see a hex nut (usually silver or plastic) that threads onto the center post. This nut is what holds the entire spray arm assembly in place.
Step 4: Locate and Remove the Center Mounting Nut
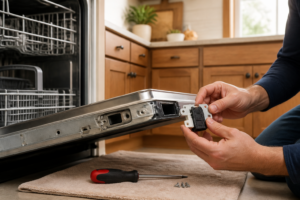
Using your 1/4-inch nut driver, carefully grip that hex nut at the base of the spray arm on the Whirlpool WDT750SAKZ. Turn it counterclockwise. It’s not going to be incredibly tight, but it’s snug enough that you’ll need a bit of leverage. I usually use a cordless drill with the nut driver bit to speed this up, but hand tools work fine too. Once it’s loose, unscrew it the rest of the way by hand and set it aside somewhere safe — you’ll reuse it or replace it depending on its condition. If it’s plastic and looks cracked or worn, grab a replacement (OEM Part #: WPW10471878 for the Whirlpool WDT750SAKZ).
Pro Tip from Dave: If that nut is stuck and won’t budge, don’t force it. Spray a little penetrating oil (like WD-40) around the threads, wait five minutes, and try again. I’ve seen a few WDT750SAKZ units where mineral buildup locks that nut up solid. Once you loosen it, the nut will spin freely by hand.
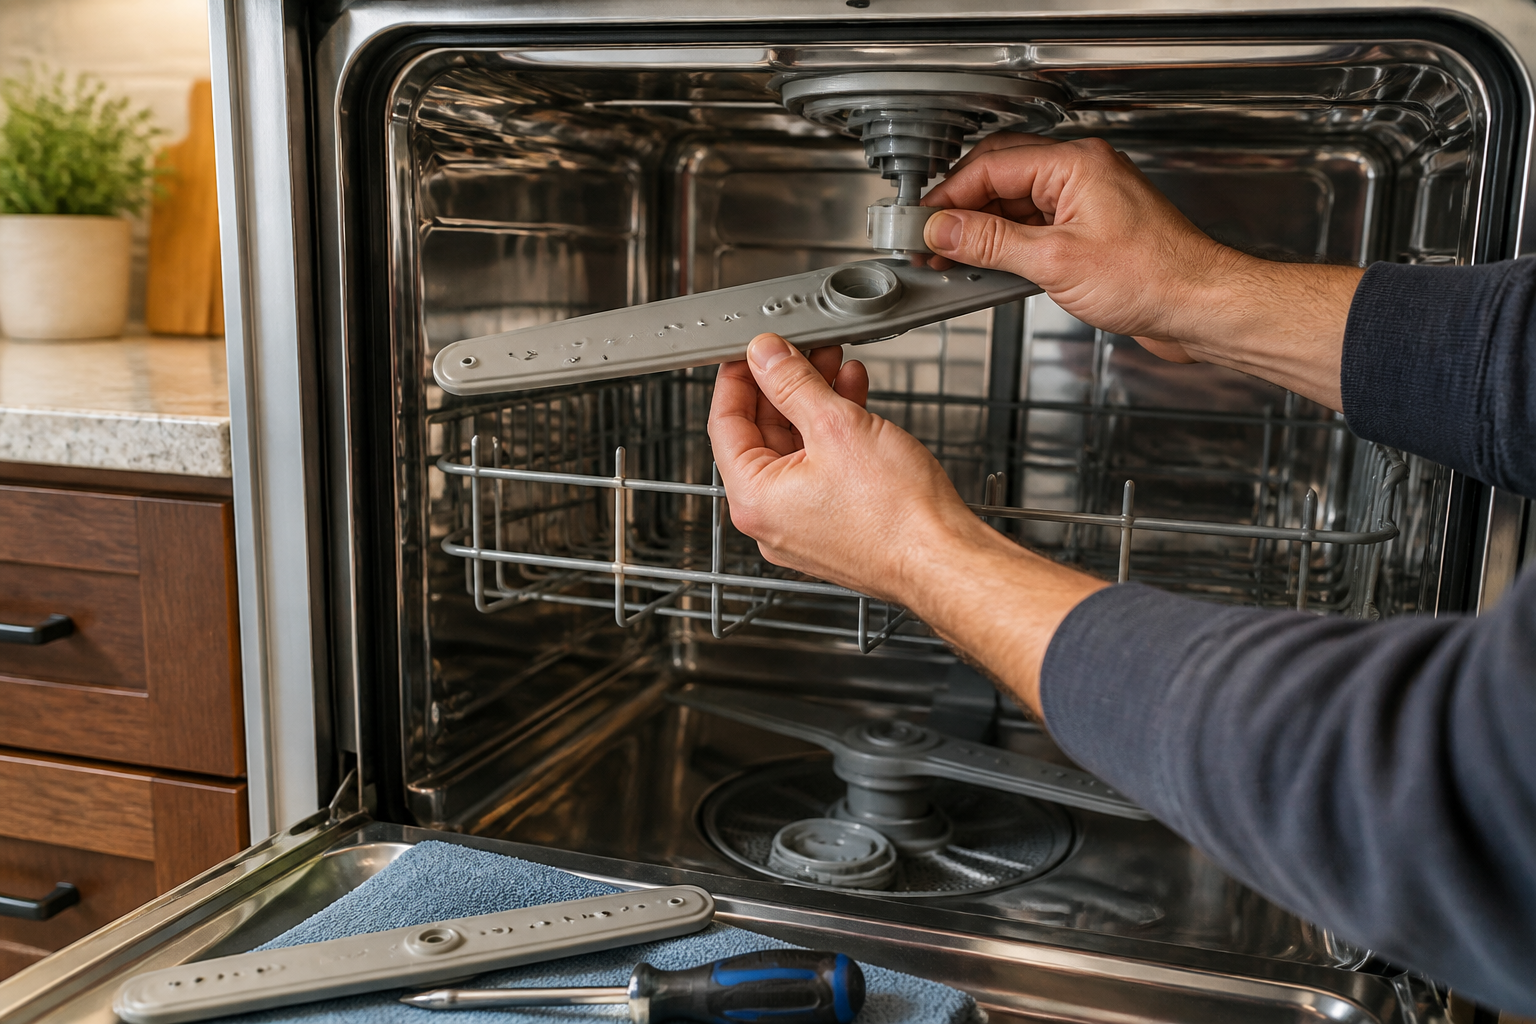
Step 5: Lift Off the Upper Spray Arm Assembly
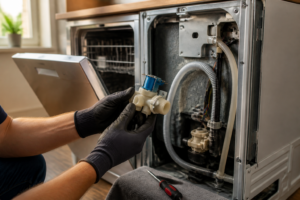
With the nut removed, grip the spray arm itself and lift it straight up off the center post. It should come away cleanly. On the Whirlpool WDT750SAKZ, the arm will likely have a small rubber bearing seal underneath it — that round rubber ring (OEM Part #: WPW10282635). It might stick to the bottom of the arm or stay on the center post. Either way, remove it now and set it aside. If it’s cracked or hardened (looks brittle), that’s a sign the arm has been in there a long time, and you’ll want a replacement seal when you reassemble.
Step 6: Inspect the Center Post and Bearing
Look down into the center post cavity of the Whirlpool WDT750SAKZ. You should see a small bearing or collar at the top of the post — it looks like a little plastic cup or ring. This is what the spray arm spins on. If it’s cracked, missing pieces, or looks rough, that’s why the arm wasn’t spinning properly. While you’re here, use your cloth to clean out any debris or mineral buildup inside the post. A dry cloth works; you can also use a soft brush if you have one. This keeps the new arm spinning smoothly.
Pro Tip from Dave: If the center bearing inside the post is damaged, you can replace it separately (OEM Part #: WPW10340667), but honestly, I’ve found that replacing the entire upper spray arm assembly usually fixes the problem. The bearing and arm come together as a matched set on newer WDT750SAKZ units, and they perform better than trying to mix old and new parts.
Step 7: Install the New Upper Spray Arm Assembly
Take your new Whirlpool WDT750SAKZ upper spray arm (OEM Part #: WPW10471877) and look at its underside. You’ll see a hole in the center and often a small collar or bearing ridge. Position the new rubber seal (WPW10282635) on the center post first — it should sit flush against the top of the post. Now, align the hole on the new spray arm with the center post and lower it straight down. It should seat firmly and feel solid. The arm should be level, not tilted to one side.
Step 8: Thread the Mounting Nut Back On
Take your hex nut (new or reused if it’s in good shape) and thread it onto the center post, securing the spray arm from below. Hand-tighten it first to make sure it’s going on straight. Once it’s hand-tight, use your 1/4-inch nut driver to snug it down — it should be tight enough that the arm doesn’t wiggle when you try to move it by hand, but you don’t need to crank it with all your might. On the Whirlpool WDT750SAKZ, this nut typically tightens to about 8–12 foot-pounds; if you have a torque wrench, that’s the target, but honestly, “snug by hand tool” is close enough. Over-tightening can crack the new arm, so be conservative.
Pro Tip from Dave: Spin the new spray arm by hand after you’ve tightened the nut. It should rotate freely with just a little resistance — smooth, like a ceiling fan blade. If it’s binding or feels rough, the nut is too tight or the bearing seal isn’t seated right. Back off the nut slightly and try again. On a properly installed WDT750SAKZ, the arm should spin with a gentle flick.
Step 9: Reinsert the Upper Rack
Slide the upper rack back into the Whirlpool WDT750SAKZ, aligning it with the rails on both sides. It should slide in smoothly and lock into place with a soft click at the front. Make sure it’s seated all the way — the rack should be level and about 2 inches below the top edge of the tub when closed. If it’s crooked or catches, pull it out and try again. Don’t force it, or you’ll damage the rails.
Step 10: Close the Door and Restore Power
Close the dishwasher door. Now, plug the Whirlpool WDT750SAKZ back in (or flip the circuit breaker back on if it’s hardwired). If you shut off the water supply earlier, turn it back on by rotating the shutoff valve counterclockwise until it stops. You’re ready to test.
Step 11: Run a Test Cycle
Select a short rinse or wash cycle on the Whirlpool WDT750SAKZ and start it. Let it run for 2–3 minutes, then open the door (carefully — there may be hot water inside) and look up at the spray arm. It should be spinning steadily. If it’s not, turn off the cycle, unplug the dishwasher again, and double-check that the nut is tight and the arm is seated correctly. If it’s spinning fine, close the door and let the cycle run to completion. Listen for any unusual sounds or leaks. You should hear a gentle whoosh as water sprays down onto the upper rack.
Step 12: Run a Full Wash Cycle and Inspect
Once the test cycle finishes, run a normal wash cycle with a load of dishes (or run an empty cycle if you prefer to be cautious). After it’s done, open the door and check the upper rack dishes for spotting or dryness. They should be clean and wet in the normal way. Also, look under the rack and around the tub to make sure there are no leaks. If everything looks good, you’re done. Congratulations — you’ve successfully replaced the upper spray arm on your Whirlpool WDT750SAKZ.
Troubleshooting — If It Still Isn’t Working
- Upper spray arm still isn’t spinning after replacement — This usually means the nut is too tight or the bearing seal isn’t positioned correctly. Unplug the dishwasher, remove the upper rack again, check that the rubber seal (WPW10282635) is sitting flat on the center post, and loosen the nut slightly. The arm should spin with gentle resistance, not bind. If you’ve tried this twice and it still won’t spin, the center post bearing cavity itself may be damaged, and you’d need the entire center post assembly replaced — that’s a more involved repair.
- Water is leaking from under the spray arm during the cycle — The rubber seal wasn’t installed or is damaged. Unplug the unit, remove the upper rack, and check that the gasket (WPW10282635) is under the spray arm and seated flush. If it’s cracked or missing, replace it. If you’ve done that and it still leaks, the new arm you installed might be defective — contact the supplier for a replacement.
- New spray arm is hitting the tub or racks during rotation — This shouldn’t happen with the correct OEM arm for the Whirlpool WDT750SAKZ (WPW10471877), but if you installed a third-party or incorrect part, it might be slightly larger. Unplug and remove the upper rack again, verify the arm is seated properly and level, and check for any visible contact with the tub walls. If it’s the wrong part, you’ll need to replace it with the correct OEM spray arm.
- Upper rack dishes are still dirty even with the new arm spinning — If the arm spins freely but doesn’t clean the dishes, you might have a clog in the spray holes. Remove the upper rack, hold the new spray arm up to a light, and look through each hole. If they’re blocked with mineral buildup or debris, soak the arm in equal parts white vinegar and water for 30 minutes, then run a small brush through each hole. Also check that the spray holes on the arm are actually facing downward — if the arm is installed backward (wrong orientation), water will miss the upper rack entirely.
- The new spray arm cracked or broke shortly after installation — This is rare with OEM parts, but it happens if the nut was over-tightened or if the arm was damaged during installation. Check that you didn’t install it backward or at an angle. If the OEM part broke under normal use, contact the supplier