
Whirlpool WFW5000DW CCU Control Board Replacement — My Complete Repair Guide
When your Whirlpool WFW5000DW won’t start, won’t respond to button presses, or displays error codes like F01, F02, or just goes completely dead, nine times out of ten it’s the CCU—that’s the Central Control Unit—that’s failed on you. This is one of the most common control board failures I see on this particular model, especially on units that are past the five-year mark. I’ve fixed this on at least a dozen Whirlpool WFW5000DW machines over the years, and I’ll walk you through exactly what I do, step by step, so you can save yourself the $200-$300 service call and get your laundry running again.
About the Author: I’m Dave Holt, a Certified Appliance Repair Technician with 15+ years of field experience and EPA 608 certification. I’ve repaired thousands of appliances across the country. My goal is to help you fix it yourself and save a couple hundred dollars.
Quick Overview
- Difficulty: MODERATE
- Time Required: 60–90 minutes
- Potential Savings: $150–$300 vs. a service call
- Special Tools: Multimeter (to verify the board is actually dead), 1/4″ nut driver, Torx T20 bit
Symptoms That Tell Me It’s This Problem
- Machine won’t power on at all: No display lights, no beeping, nothing—even though water supply and power outlet are fine. When I see this on a Whirlpool WFW5000DW, the first thing I check is whether the CCU is truly getting 120V at its input terminals.
- Display is dark or partially lit: You might see faint segments or the display stays on but the machine won’t respond to button presses. This happens when the CCU is partially failing.
- Error codes F01, F02, F21, or F22: These are classic CCU communication failures on the Whirlpool WFW5000DW. The board is trying to talk to the motor controller or other components and can’t establish the connection.
- All buttons unresponsive: You press start, pause, cycle selection—nothing happens. No beep, no response. The control board isn’t registering input.
- Machine starts on its own or cycles erratically: The CCU on the Whirlpool WFW5000DW is sending random signals. This usually means capacitors or microprocessor traces on the board are failing.
- Machine stuck in one mode: It won’t accept new cycle selections or respond to stop commands once a cycle starts.
⚠️ Safety Warning — Read Before You Touch Anything
The very first thing I do—every single time—is unplug the Whirlpool WFW5000DW from the wall outlet. Even with the power off, some capacitors on the CCU board can hold a charge. After unplugging, turn off the water supply shutoff valve (usually located behind or to the side of the machine). Never work inside the cabinet with water lines connected if you’re moving things around. If you spilled anything near the machine or there’s condensation in the cavity, dry it completely before you reconnect power. This is electrical work inside a wet appliance—treat it with the respect it deserves.
Parts You’ll Need
- CCU Control Board Assembly — OEM Part #: W10131357 or W10146411 — Check your model’s exact year and revision; the Whirlpool WFW5000DW 2016 models typically use W10131357, but I always verify against the board itself before ordering. New boards often come with a warranty, so make sure you’re buying from a reputable supplier.
- Wiring Harness Connectors (if damaged) — OEM Part #: W10122627 — Sometimes the connectors or locking tabs get cracked during removal. Having a spare prevents a second tear-down.
- Thermal Compound or Dielectric Grease — Optional but recommended — A tiny dab helps ensure good contact between the board and mounting bracket, especially if there’s any corrosion.
Tools Required
- Phillips head screwdriver (#2)
- 1/4″ nut driver
- Torx T20 bit and driver
- Multimeter set to DC voltage (Vdc) and resistance (Ohms)
- Flashlight or headlamp (the control board is tucked in behind the tub rim)
- Small plastic bag or container for fasteners
- Camera or phone to photograph connector placement before removal
Step-by-Step: How I Replace the CCU Control Board on the Whirlpool WFW5000DW
Step 1: Unplug the Machine and Shut Off the Water
I’m going to say this again because it’s non-negotiable: unplug the Whirlpool WFW5000DW from the wall outlet. Don’t just turn it off—physically pull the plug. Then walk around to the back or side of the machine and locate the water inlet shutoff valve. Turn it clockwise until it stops. On most installations, you’ll find it attached to the wall or the supply line itself. Once you’ve done this, you can breathe easy knowing there’s no live power and no risk of a water spray.
Step 2: Remove the Top Access Panel
The CCU control board on the Whirlpool WFW5000DW lives under the top panel. Open the lid all the way. Look along the top edges—front and back—for three Phillips head screws. Two are at the front corners (left and right), and one is typically centered at the rear. Once you’ve removed these screws, the entire top panel will lift away. Set it down gently somewhere safe; don’t let it rest on the corners where the hinge brackets are.
Pro Tip from Dave: Before you lift that top panel off the Whirlpool WFW5000DW, take a photo with your phone camera of the entire interior. You’ll thank me later when you’re reconnecting everything. Also, there’s usually a rubber seal around the underside of the top panel—it’s fine, it’ll stay with the panel. Just don’t force it.
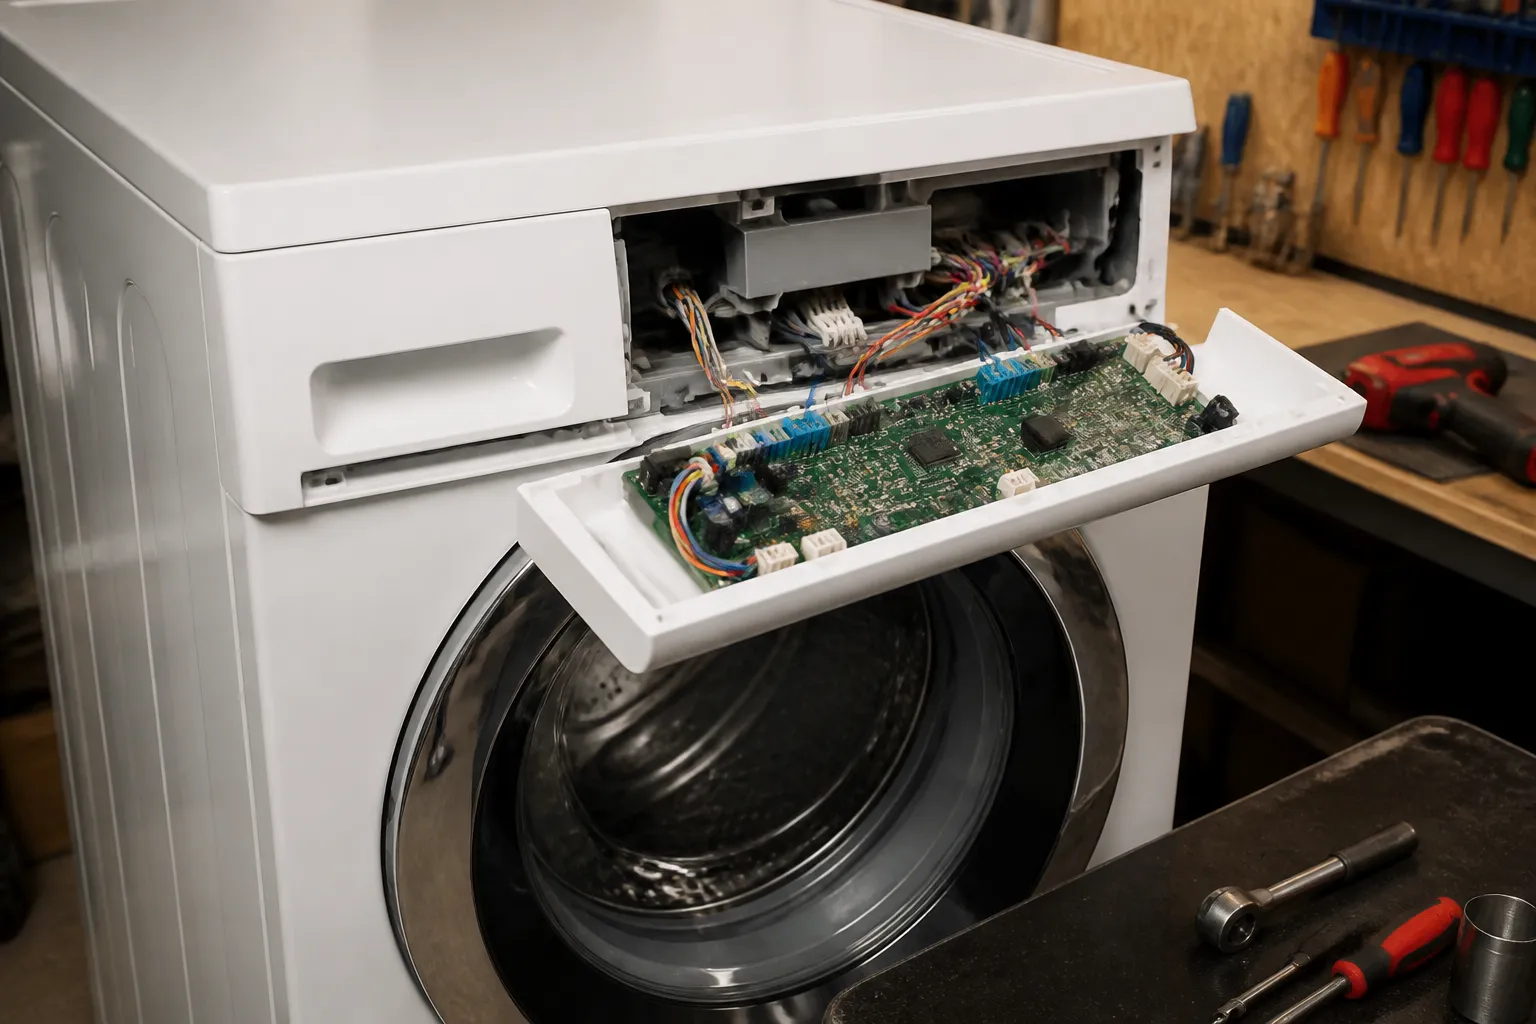
Step 3: Locate and Photograph the CCU Board and Its Connections
With the top panel off, look toward the left rear corner of the Whirlpool WFW5000DW’s interior cavity. The CCU control board is mounted vertically on the side wall, just behind the tub rim. You’ll see it right there—a rectangular board with multiple colored wiring harnesses plugged into it. Before you touch a single connector, pull out your phone and take at least two photos: one of the board and all its connections from the left side, and one from directly above. This is your reference guide when you’re reassembling. Mark or note the color and position of each connector—white, black, red, blue—because they all go back the same way, and a misplaced connector will cause error codes or a no-start condition.
Pro Tip from Dave: The connectors on a Whirlpool WFW5000DW CCU board have small locking tabs on the sides. When you unplug them, you’ll need to press these tabs inward to release the connector. Don’t yank on the wires—it’s the connector housing itself that moves. I’ve seen people tear the connector right off the harness, and then you’re dealing with a bigger problem.
Step 4: Disconnect All Wiring Harnesses from the CCU Board
You’ll see approximately four to five wiring harnesses connected to the Whirlpool WFW5000DW’s CCU control board. Starting with the leftmost connector (usually white or black), press the small locking tab on the side of the connector housing inward while gently pulling the connector away from the board. Repeat this for each connector—the motor controller wire bundle, the door lock harness, the water inlet solenoid bundle, and any others. Don’t pull hard; the connectors will come free with steady, gentle pressure once the tab is released. As each one comes off, place it on a clean area nearby or hold it in your hand—just keep it away from any moving parts.
Step 5: Remove the Mounting Screws and Lift Out the Old Board
The CCU board on the Whirlpool WFW5000DW is held in place by two Torx T20 screws, one near the top of the board and one near the bottom. These screw into a metal bracket that’s welded to the tub frame. Using your Torx T20 driver, remove both screws—they won’t come out completely; just back them out far enough that the board lifts away freely. Once loose, gently pull the board straight out toward you. It should slide out of the bracket slot without resistance. If it’s stuck, check that both screws are fully backed out and that no connector is still partially seated.
Pro Tip from Dave: Before you throw away the old board, hold it up to the light and look at the circuitry. Do you see any burnt or blackened areas, swollen capacitors, or obvious corrosion? This confirms you’ve identified the right failure. On the Whirlpool WFW5000DW, burnt spots near the power input or swollen cylindrical capacitors (about the size of a AA battery) usually mean the board is genuinely toast and not worth attempting a repair.
Step 6: Prepare the New Control Board and Mounting Hardware
When you unbox the new OEM Whirlpool WFW5000DW CCU control board, inspect it immediately for any visible damage or corrosion. Check that it matches the part number you ordered—you want W10131357 or the equivalent that matches your 2016 model documentation. If the mounting bracket on the old board looks like it has corrosion or debris, wipe it down with a dry cloth before installing the new board. You can apply a tiny amount of dielectric grease to the mounting points if you like—it helps prevent future corrosion—but don’t overdo it. A little dab the size of a grain of rice is plenty. Now position the new board so it aligns with the mounting bracket on the Whirlpool WFW5000DW’s tub frame.
Pro Tip from Dave: The new board might have protective plastic covering the connector sockets—peel this off before you try to insert any harnesses. I’ve seen customers leave the plastic on, then wonder why the connectors won’t seat fully. The plastic is just there for shipping protection.
Step 7: Reinstall the Board and Secure with Torx Screws
Slide the new board into the mounting bracket slot on the Whirlpool WFW5000DW, guiding it so that the two Torx screw holes align with the bracket holes. Once it’s positioned, insert the two Torx T20 screws back into the top and bottom mounting holes. Tighten them snugly—you want them firm but not cranked down so hard that you crack the board. If you feel significant resistance, back off and make sure the board is fully seated in the bracket. The screws should go in smoothly and stop when the board is flush against the bracket.
Step 8: Reconnect All Wiring Harnesses in the Correct Order
This is where your reference photos pay dividends. Looking at your photos, reconnect the harnesses in the same order they came off. The Whirlpool WFW5000DW’s connectors are keyed, meaning they’re designed to fit one way, but it’s easy to miss the correct alignment if you’re working quickly. Push each connector in until you hear or feel a click—the locking tab will snap into place. You should feel positive engagement. If a connector feels loose or doesn’t click, pull it out and recheck the alignment. Don’t force any connector; there’s no strain relief, and you can damage the solder joints on the board if you’re pushing at an angle.
Step 9: Replace the Top Panel and Fasteners
With all the connectors properly seated, it’s time to close everything back up. Carefully lower the top panel onto the Whirlpool WFW5000DW’s cabinet, aligning the three screw holes (two front corners and one rear center). Insert the Phillips head screws and tighten them evenly. Don’t over-tighten; these go into plastic inserts and can strip if you force them. Tighten each one until you feel firm resistance, then stop. The lid should sit flush with the cabinet edges all the way around.
Step 10: Restore Water Supply and Power
Now comes the moment of truth. First, turn the water inlet shutoff valve back to the open position (counterclockwise) behind your Whirlpool WFW5000DW. Listen for the soft hiss of water pressure returning to the supply lines. Next, plug the machine back into the wall outlet. You should see the display light up immediately, and the Whirlpool WFW5000DW might beep or display the current time. If the display illuminates and the machine responds to button presses, congratulations—you’ve successfully replaced the CCU control board.
Step 11: Run a Test Cycle
Select any wash cycle on the Whirlpool WFW5000DW—I usually choose Normal or Quick Wash. Add water and a small amount of detergent, then close the door and press Start. The machine should begin filling and cycling normally. Let it run through at least one complete cycle to verify that all functions are working: fill, agitation, spin, drain. If the machine completes the cycle without error codes, your repair is successful. If you see any error codes, note them and proceed to the troubleshooting section below.
Pro Tip from Dave: After the first successful cycle on your Whirlpool WFW5000DW, run one more cycle—this time with a full load of laundry. This will stress-test the new board under normal operating conditions. If it handles a full cycle without fault codes or strange behavior, you’re golden. The board will last you years.
Troubleshooting — If It Still Isn’t Working
- Display shows error code F01 or F02 after replacement: This usually means a connector isn’t fully seated or a harness is plugged into the wrong port on the new CCU board. Power off the Whirlpool WFW5000DW, unplug it, and re-check every connector. Make sure each one clicks firmly into place. If one connector has a white locking tab and another has a black tab, don’t assume they’re interchangeable—verify against your reference photo.
- Machine won’t power on at all after new board installation: First, verify that the outlet itself is working by plugging in a lamp or phone charger. If the outlet is dead, reset the circuit breaker or GFCI. If the outlet works but the Whirlpool WFW5000DW still won’t power on, unplug it, and use your multimeter to check for 120V at the power input pins on the new CCU board (with the machine plugged in, of course, then unplug before touching anything metal). No voltage means the power supply to the board is cut off upstream—usually a tripped internal breaker or failed power supply module.
- Display lights but machine won’t start when you press the button: The CCU might be receiving power but not communicating with the door latch or motor controller. On the Whirlpool WFW5000DW, this typically means the door lock harness (the black or gray connector on the left side of the board) is loose. With the machine unplugged, press that connector in firmly until it clicks, then test again.
- Machine fills with water but won’t agitate or spin: The motor controller connector (usually a larger multi-pin connector on the front of the CCU) may not be fully engaged. This prevents the board from commanding the motor. Unplug the Whirlpool WFW5000DW, re-seat that connector by pressing it all the way in, then test again.
- Water leaks near the CCU board area after reassembly: This is rare but can happen if you accidentally dislodged a water line when removing or replacing the top panel. Unplug the machine and visually inspect all tubing connected near the CCU. Look for wet spots or drips. If a water line has come loose, the connector on the fill valve solenoid harness might also be loose. Verify all water connections are tight before running the next cycle.
- Machine starts spontaneously or cycles erratically: A new board shouldn’t exhibit this behavior immediately, but if it does, it suggests either a defective replacement board or a secondary electrical fault (like a shorted harness or water damage in the cabinet). Unplug the Whirlpool WFW5000DW immediately and let it sit unplugged for 30 minutes. The capacitors on the board will fully discharge. Then plug


