
Ice maker freezing over
This step-by-step repair guide walks you through fixing ice maker freezing over on your Samsung RF23M8070SR (French Door). With the right tools and parts, most homeowners can complete this repair in 1–2 hours and avoid a costly service call.
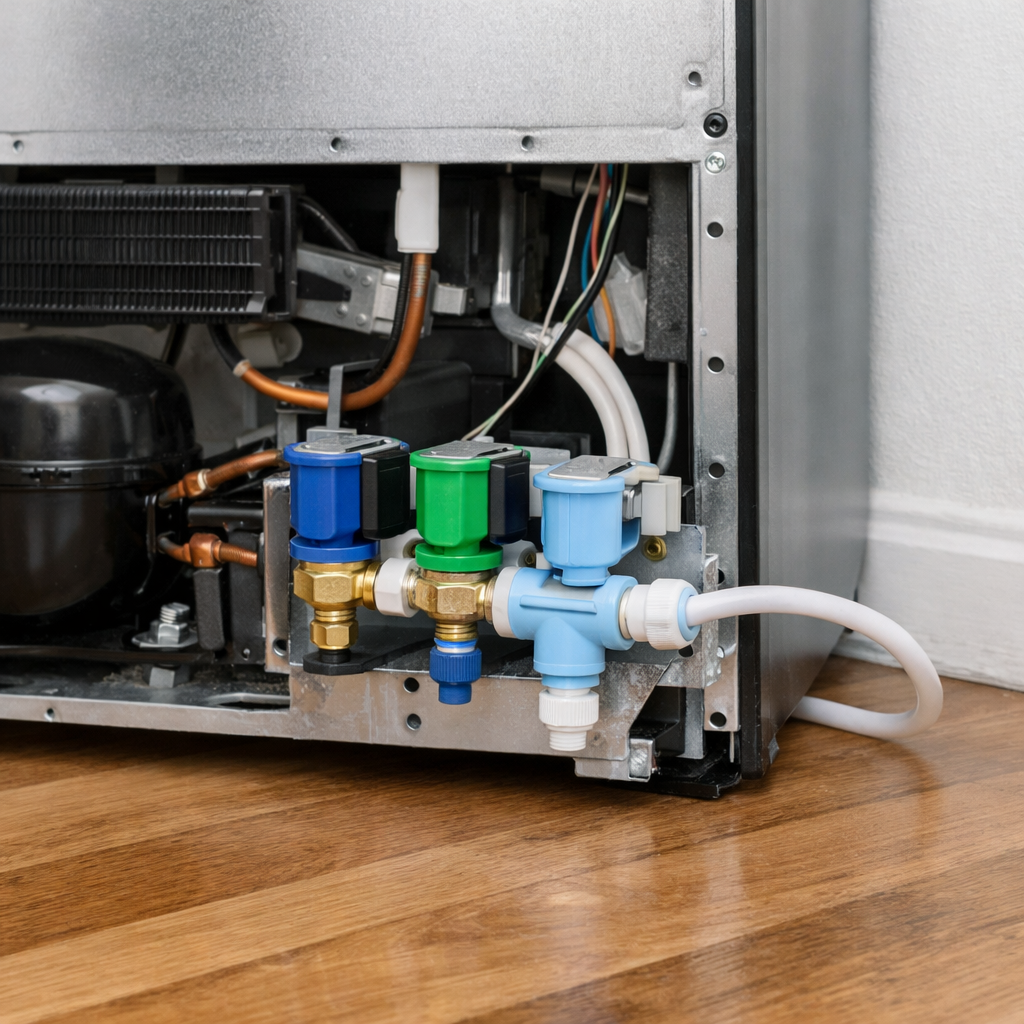
🔨 Pro Tip from Dave
On the RF23M8070SR, a lot of techs replace the ice maker assembly first and miss that the real villain is the dual water inlet valve — specifically the ice maker solenoid side (part DA97-07365G). If that valve doesn’t fully shut off, you’ll get a slow drip that refreezes the tray within days. Always test valve resistance before closing up the job or you’ll be back for a callback.
Part of our Top 20 Refrigerator Models & Common Repair Issues Guide. Browse all refrigerator repair guides for related models and issues.
“`html
Common Symptoms & Causes
If your Samsung RF23M8070SR ice maker is freezing over, you’ll likely notice one or more of the following warning signs before it stops producing ice entirely.
- Ice cubes are clumped together in a solid frozen mass inside the ice bin
- The ice maker arm is stuck and won’t cycle, blocked by ice buildup
- A visible sheet of frost or ice covers the ice maker unit behind the freezer door panel
- The ice dispenser is jammed and returns no ice despite the bin appearing full
This issue is most commonly caused by a faulty ice maker defrost sensor, a worn door gasket allowing warm air infiltration, or a failed defrost heater that allows frost to accumulate unchecked around the ice maker assembly.
“`
Safety First
- Unplug the refrigerator from the power outlet before starting any repair — never work on a live appliance.
- Shut off the water supply valve before disconnecting any water lines or hoses.
- Wear work gloves when handling metal brackets, sheet metal edges, or sharp components.
- Take photos with your phone before disconnecting any wiring harnesses or connectors.
- Work in a well-lit area with enough floor space to lay removed panels flat.
Tools & Parts Needed
Essential Tools
- Phillips #2 screwdriver
- ¼” nut driver
- Needle-nose pliers
- Multimeter
- Flashlight or work light
Replacement Parts
Step-by-Step Repair Instructions
Step 1
Unplug the refrigerator from the wall outlet and remove all food from the freezer compartment before starting any work. This eliminates the risk of electric shock and gives you clear access to the interior components. Pro tip: pack perishables in a cooler with ice so you can work without time pressure.
Step 2
Remove the five Phillips #2 screws securing the freezer back panel and pull the panel away from the wall. Heavy ice buildup on the evaporator coils behind this panel is the telltale sign of a defrost system failure — the heater is not cycling on to melt accumulated frost, which eventually blocks airflow and stops ice production. Safety note: the panel edges can be sharp, so wear work gloves during removal.
Step 3
Set your multimeter to Rx1 and probe both terminals of the defrost heater, which is the looped element woven through the evaporator coils. A healthy heater reads 20–50 ohms; an open circuit (OL or infinite resistance) means the element has burned out and must be replaced. This test tells you definitively whether the heater itself is the root cause before you spend money on other parts.
Step 4
Locate the bi-metal defrost thermostat clipped to the evaporator coils — it acts as a safety cutoff that opens the heater circuit if temperatures get dangerously high. Test it with your multimeter on the continuity setting at room temperature; you should hear a beep or see near-zero resistance, confirming the contacts are closed and the part is good. An open reading at room temperature means the thermostat has failed and needs to be replaced.
Step 5
If both the heater and thermostat test good, the defrost control board timer is the likely culprit, and you can confirm this by manually advancing it. Insert a flat-head screwdriver into the timer shaft slot on the board and turn it clockwise until you hear a click, which forces the unit into a defrost cycle. If the heater does not activate and begin melting ice within 30 minutes, the control board is faulty and must be replaced.
Step 6
Reattach the freezer back panel with the five Phillips screws, making sure the panel seats flush with no gaps that could cause air leaks. Plug the refrigerator back in and allow at least 12 hours for temperatures to fully stabilize before restocking food, since loading a warm unit too soon can strain the compressor and skew your results. Pro tip: place a thermometer in the freezer to confirm it reaches 0°F before considering the repair complete.
Where to Buy Replacement Parts
Find genuine OEM and aftermarket replacement parts for your Samsung RF23M8070SR (French Door) on Amazon:
- Samsung RF23M8070SR defrost heater DA47-00244B
- Samsung refrigerator defrost thermostat DA47-00139C
- Samsung refrigerator defrost control board DA41-00651R
When to Call a Professional
If the issue persists after completing all steps above, the problem may involve the sealed refrigerant system, a failed main control board, or wiring that requires specialized diagnostic equipment. Contact a licensed appliance technician — attempting sealed-system repairs without EPA 608 certification is illegal and unsafe.
How Much Does This Repair Cost?
DIY parts for fixing a freezing ice maker on the Samsung RF23M8070SR typically run between $20–$80, depending on whether you need a new ice maker assembly, door gasket, or defrost components. A professional service call for this repair usually costs $150–$300 in labor alone. Tackling this yourself can save you $100 or more.
Frequently Asked Questions
Why does my Samsung RF23M8070SR ice maker keep freezing over?
The most common cause is a faulty defrost cycle or a damaged door gasket allowing warm air in, which causes frost buildup around the ice maker assembly. Checking the gasket seal and running a manual defrost cycle is a good first step.
How do I manually defrost the ice maker on this model?
Press and hold the Energy Saver and Freezer buttons simultaneously for about 8 seconds to enter Forced Defrost mode. Select the FF option to defrost the freezer compartment where the ice maker sits.
Will fixing the ice maker require replacing any parts?
In many cases, you may need to replace the ice maker fan motor or the water inlet valve if they are contributing to the freeze-over problem. Both parts are widely available and relatively affordable for the RF23M8070SR.
Recommended Products
These are the parts and tools we recommend for this repair, based on compatibility and customer reviews:
- Refrigerator Ice Maker Assembly Replaces for Samsung RF23M8070SR RF23J9011SR RF23J9011SR/AA RF23M8070SG RF23M8070SG/AA RF23M8070SR/AA RF23M8090SG RF23M8070SG/AA-0000 RF23M8070SR/AA-0000 Refrigerator
- Refrigerator Ice Maker Assembly for Samsung RF23M8070SR/AA-03
- SAMSUNG DA97-17285A Refrigerator Ice Bucket & Auger Assembly, Ice Container, Genuine Original Equipment Manufacturer (OEM) Part
- SAMSUNG DA97-07365G ASSEMBLY ICE MAKER AW-PJ OEM Original Part
As an Amazon Associate, I earn from qualifying purchases.


