Sensor dry leaving wet dishes
This step-by-step repair guide walks you through fixing sensor dry leaving wet dishes on your Whirlpool WDT970SAKZ. With the right tools and parts, most homeowners can complete this repair in 1–2 hours and avoid a costly service call.
🔨 Pro Tip from Dave
On the WDT970SAKZ, don’t overlook the vent and fan assembly (part W10596852) — a lot of techs jump straight to the heating element, but this model relies heavily on fan-assisted drying, and a seized fan motor is often the real villain. A common mistake is forgetting to check the rinse aid cap seal, which can crack and prevent proper dispensing even when the reservoir appears full.
Part of our Top 20 Dishwasher Models & Common Repair Issues Guide. Browse all dishwasher repair guides for related models and issues.
“`html
Common Symptoms & Causes
If your Whirlpool WDT970SAKZ is leaving dishes wet after a full cycle, these are the most common signs pointing to a sensor dry failure.
- Dishes and glassware remain visibly wet or pooled with water after the cycle completes
- The dishwasher finishes the cycle earlier than expected, skipping the heated dry phase
- Plastic items on the bottom rack are soaking wet while top-rack items are only slightly damp
- The control panel shows a completed cycle with no error code, despite wet dishes inside
These symptoms are most often caused by a faulty moisture sensor, a failed vent and fan assembly, or a worn heating element that can no longer properly detect or drive away moisture during the drying phase.
“`
Safety First
- Unplug the dishwasher from the power outlet before starting any repair — never work on a live appliance.
- Shut off the water supply valve before disconnecting any water lines or hoses.
- Wear work gloves when handling metal brackets, sheet metal edges, or sharp components.
- Take photos with your phone before disconnecting any wiring harnesses or connectors.
- Work in a well-lit area with enough floor space to lay removed panels flat.
Tools & Parts Needed
Essential Tools
- Phillips #2 screwdriver
- Torx T20 screwdriver
- Needle-nose pliers
- Multimeter
- Flashlight
Replacement Parts
- Heating element
- vent wax motor
- rinse aid dispenser
- multimeter
Step-by-Step Repair Instructions
Step 1
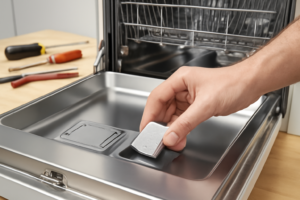
Rinse aid is essential for proper drying because it reduces water’s surface tension, allowing droplets to sheet off dishes instead of pooling. Fill the rinse aid reservoir completely and set the dispenser to level 4–5 if you have hard water, which leaves more mineral residue. Without adequate rinse aid, even a fully functioning dishwasher will leave wet dishes, so rule this out before testing components.
Step 2
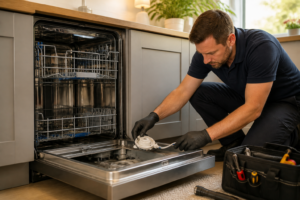
The vent wax motor opens the door vent at the end of the cycle to release steam, and if it fails stuck-closed, that trapped humidity re-deposits moisture on your dishes. Remove the two T20 Torx screws to access the motor behind the vent on the inner door top, then set your multimeter to Rx1 and probe the motor terminals — a healthy motor reads 300–500Ω, while an open reading means the motor has failed and needs replacement. Pro tip: manually push the vent flap to confirm it moves freely; if it’s physically jammed by debris rather than a dead motor, cleaning it may resolve the issue without a part replacement.
Step 3
The heating element at the sump base generates the heat needed to evaporate moisture during the dry cycle, and an open element means the dishwasher runs a dry cycle with no heat at all. Tilt the unit back to access the element, set your multimeter to Rx1, and probe the element terminals — a good element reads 15–30Ω, and any open (OL) reading confirms it must be replaced. Safety note: always disconnect power at the breaker before accessing internal components, and let the unit cool fully if you’re testing right after a cycle.
Step 4
Selecting Air Dry instead of Heated Dry significantly reduces drying performance because the cycle relies on residual heat alone, which is often insufficient — especially for plastics and dense loads. Always choose Heated Dry immediately after the final rinse to ensure the element actively drives evaporation while dishes are still hot. If a household member is selecting Air Dry to save energy, this single setting change may fully resolve the complaint without any repair.
Step 5
Plastic items have low thermal mass and don’t retain heat the way glass and ceramic do, so they cool quickly and collect condensation during drying regardless of cycle settings — this is normal behavior. Load plastic items on the upper rack only and tilt them at roughly 45° so water drains off the surface rather than pooling in concave areas. Setting accurate customer expectations here matters: even a perfectly functioning dishwasher will leave trace moisture on plastics, and that is not a fault.
Step 6
After replacing the vent motor or heating element, run a complete Normal cycle with Heated Dry selected as your confirmation test. All ceramic and glass items should exit the cycle completely dry — any remaining moisture on those items indicates a second fault or an incorrect part installation. Plastics may still show minor moisture, which is expected, but bone-dry glass and ceramic confirms the repair was successful.
Where to Buy Replacement Parts
Find genuine OEM and aftermarket replacement parts for your Whirlpool WDT970SAKZ on Amazon:
- Whirlpool WDT970SAKZ heating element WPW10518394 replacement
- Whirlpool dishwasher vent wax motor replacement W10670638
- Whirlpool dishwasher rinse aid level check adjustment
When to Call a Professional
If the issue persists after completing all steps above, the problem may involve the sealed refrigerant system, a failed main control board, or wiring that requires specialized diagnostic equipment. Contact a licensed appliance technician — attempting sealed-system repairs without EPA 608 certification is illegal and unsafe.
“`html
How Much Does This Repair Cost?
DIY parts for fixing sensor dry issues on the Whirlpool WDT970SAKZ typically cost $15–$75, depending on whether you need a new rinse aid dispenser, turbidity sensor, or heating element. A professional service call runs $150–$300 once you factor in labor and diagnostics. Tackling this repair yourself can save you $100 or more.
“`
Frequently Asked Questions
Why is my Whirlpool WDT970SAKZ leaving dishes wet even on the Sensor Dry setting?
The most common cause is a faulty moisture sensor or a clogged rinse aid dispenser that prevents proper drying. Check that the rinse aid reservoir is full and the sensor strip inside the tub is clean and free of residue.
How do I clean the moisture sensor on my WDT970SAKZ?
Wipe the sensor bar inside the dishwasher tub with a soft cloth dampened in white vinegar to remove mineral buildup. Avoid abrasive scrubbers, which can damage the sensor surface.
Could a broken heating element cause wet dishes on the Sensor Dry cycle?
Yes, a failed heating element will prevent the dishwasher from generating enough heat to dry dishes properly. Use a multimeter to test the element for continuity and replace it if no reading is detected.
Recommended Products
These are the parts and tools we recommend for this repair, based on compatibility and customer reviews:
- BlueStars 8558307 Dishwasher Dispenser Cap – Ultra Durable Rinse Aid Cap Compatible with Whirlpool Kenmore Dishwashers – Replaces WP8558307 8193984 8539095 PS11746426 AP6013204
- BlueStars W10524920 Dishwasher Rinse Aid Cap – Ultra Durable Dispenser Cap Compatible with KitchenAid Whirlpool Dishwashers – Replaces W10482848, WPW10524920, PS11755939, AP6022605, PS6883851
As an Amazon Associate, I earn from qualifying purchases.