Not Cleaning Dishes
This guide walks you through diagnosing and fixing a Whirlpool WDT730PAHZ built-in dishwasher that is not cleaning dishes properly. We cover the most common causes — from a clogged spray arm to a failing wash pump — and give you clear, actionable steps to get your dishwasher back to full performance. Most homeowners with basic mechanical skills can complete this repair in 1 to 2 hours using common household tools.
Common Symptoms & Causes
Before starting the repair, confirm your dishwasher matches one or more of these symptoms:
- Dishes come out with food residue or a greasy film after a full cycle
- The bottom rack cleans poorly while the top rack appears cleaner, or vice versa
- Standing water or gritty debris remains in the bottom of the tub after the cycle ends
- The dishwasher runs a full cycle but dishes feel as though they were never sprayed with water
The most common root cause on the WDT730PAHZ is a blocked or damaged spray arm combined with a clogged filter assembly, which restricts water flow and pressure throughout the wash cycle.
Safety First
- Unplug the dishwasher from the wall outlet or switch off the dedicated circuit breaker before beginning any work
- Wear work gloves to protect your hands from sharp metal edges inside the tub and door panel
- Photograph all wiring connections before disconnecting anything so you can reassemble correctly
- Work in a well-lit space and keep a dry towel nearby to absorb residual water in the sump area
Tools & Parts Needed
Essential Tools
- Phillips head screwdriver (#2)
- Torx T20 screwdriver bit
- Needle-nose pliers
- Small soft-bristle brush or old toothbrush for cleaning ports
- Multimeter for testing the wash motor and water inlet valve
Replacement Parts
- Upper and Lower Spray Arm Assembly
- Fine Mesh Filter and Ultra-Fine Filter Assembly (W10872845)
- Circulation Pump and Wash Motor Assembly (W11032770)
Step-by-Step Repair Instructions
🔨 Pro Tip from Dave
On the WDT730PAHZ, the middle spray arm feeds through a tower that clips into the upper rack — homeowners constantly overlook it when cleaning spray arms because it’s easy to mistake the clog for an upper rack alignment issue. Pull that rack all the way out and spin the tower spray arm by hand; if it’s stiff or won’t rotate freely, that arm alone can kill wash performance on the entire top and middle zones.
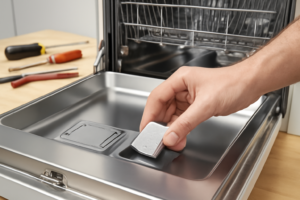
Step 1: Remove and Inspect the Filter Assembly
Pull out the lower rack and locate the cylindrical filter in the center of the tub floor. Twist the upper filter counterclockwise and lift it out along with the flat mesh screen beneath it. Rinse both pieces under warm running water and use a soft brush to clear any packed food debris from the mesh. If the mesh is torn or the plastic housing is cracked, replace the filter assembly — a damaged filter allows food particles to recirculate and coat dishes.
Step 2: Clean the Lower Spray Arm
Lift the lower spray arm straight up off its center post — it snaps off without tools on the WDT730PAHZ. Hold it up to a light source and look through each spray nozzle hole; blocked holes will show no light. Use a toothpick or thin wire to clear each port, then flush water through the arm. If the arm is cracked or wobbles excessively on its post, replace it to restore even water distribution across the lower rack.
Step 3: Clean the Upper Spray Arm and Delivery Tube
Remove the upper rack entirely, then unscrew the upper spray arm by turning the center nut clockwise (it is reverse-threaded). Check all nozzle ports and the delivery tube connection at the back of the tub for lime scale buildup. Soak the arm in white vinegar for 20 minutes if mineral deposits are heavy, then rinse and reinstall. A restricted upper spray arm is often responsible for poor cleaning on the top rack specifically.
Step 4: Check the Water Inlet Valve
Shut off the water supply and disconnect the inlet line at the bottom left of the dishwasher cabinet. Visually inspect the inlet screen inside the valve port for sediment buildup and clean it if necessary. Use your multimeter to test the solenoid coil — a healthy valve reads between 500 and 1500 ohms; an open or shorted reading means the valve is faulty and needs replacement, as inadequate water fill volume directly causes poor wash performance.
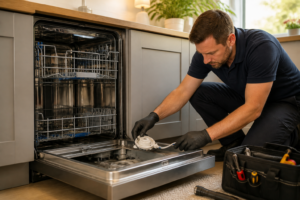
Step 5: Test the Circulation Pump Motor
Access the circulation pump by removing the lower access panel and tilting the dishwasher back slightly. Disconnect the pump motor wiring harness and test the motor windings with your multimeter — expect a resistance reading of roughly 4 to 6 ohms on a good motor. If the reading is infinite (open circuit) or zero (short), the wash pump assembly needs replacement; a weak pump produces very low spray pressure even when the filter and spray arms are perfectly clean.
Step 6: Verify Detergent Dispenser Operation
Open the door and manually actuate the detergent dispenser lid to confirm it snaps open freely and is not sticky or warped. Run a short wash cycle and check mid-cycle whether the door has released — a stuck dispenser means detergent never enters the wash water, leaving dishes unclean regardless of water pressure. If the spring or latch is broken, the dispenser assembly (part W10224430) is inexpensive and straightforward to swap out.
Step 7: Run a Test Cycle and Verify Results
Reassemble all components, restore power and water, and run a heavy-duty cycle with a fresh detergent pod and a rinse aid dispenser that is filled to the max line. Inspect dishes immediately after the cycle ends — they should come out clean with no residue and no standing water in the tub. If cleaning is still poor after completing all steps, proceed to the professional guidance section below.
How Much Does This Repair Cost?
DIY parts for this repair typically run between $15 and $120 depending on which component is at fault. A replacement filter assembly costs around $15 to $25, new spray arms run $20 to $40, and a full circulation pump assembly is the largest expense at $70 to $120. Compare that to a professional service call on the WDT730PAHZ, which averages $150 to $300 including labor and parts markup. Doing the repair yourself saves $100 to $200 or more and can be completed in a single afternoon.
When to Call a Professional
Most of the repairs in this guide are within reach for a careful DIYer with basic tools. In my experience, if you’ve cleaned the filter, cleared the spray arms, and confirmed water is filling properly but the wash pump runs loudly, pulses, or hums without building pressure, you’re looking at a pump motor failure or a seized impeller that requires proper diagnosis with a multimeter and safe pump disassembly — that’s the point to call a certified tech before you risk damaging the sump assembly. When in doubt, a diagnostic service call typically costs $80–$120 and can save you from a misdiagnosis that costs more in parts.
Where to Buy Replacement Parts
You can order all the parts referenced in this guide directly from Amazon using the links below. Each link searches specifically for WDT730PAHZ-compatible components so you get the correct fit the first time:
- Whirlpool WDT730PAHZ Upper and Lower Spray Arm Assembly
- Whirlpool WPW10491331 Genuine OEM Dishwasher Lower Wash Arm Assembly Replacement Part – Replaces W10491331 is a direct OEM fit for this model, ensuring you get the correct spray pattern and water pressure that Whirlpool engineered for this machine. Swapping it in takes only a few minutes and can restore full cleaning performance to your lower rack. (As an Amazon Associate I earn from qualifying purchases.)
Once you’ve addressed the lower arm, don’t overlook the middle spray arm — a blocked or broken center arm will leave your top rack dishes consistently dirty, no matter how well everything else is working. The IWIWE W10448645 Dishwasher Center/Middle Spray Arm – Compatible with Whirlpool/Amana/Maytag, Replaces WPW10448645, AP6021549, PS11754873, 2312063 is a compatible aftermarket replacement that fits Whirlpool, Amana, and Maytag models sharing this platform. It snaps into place without any special tools and is a cost-effective way to restore even water distribution throughout the entire wash cycle.
Before you button everything back up, check the center wash arm support as well — if this plastic housing is cracked or warped, your spray arms won’t seat correctly and you’ll be chasing the same cleaning problem all over again. The Post Views: 0