LG QuadWash Spray Arm Stuck: Complete Troubleshooting and Repair Guide
LG’s QuadWash dishwashers feature an innovative four-arm spray system with dual spray arms at both the upper and lower levels, each rotating independently to provide comprehensive cleaning coverage. However, when one or both spray arms become stuck, it’s one of the most common issues homeowners encounter. This guide will walk you through identifying the problem, disassembling the spray arm assembly, cleaning or replacing damaged parts, and reassembling everything correctly so your QuadWash performs like new.
Safety Warning
⚠️ ELECTRICAL SAFETY: Before beginning any repair work on your LG QuadWash dishwasher, disconnect the unit from electrical power. Either flip the circuit breaker serving the dishwasher to the OFF position or unplug the unit if it has a plug. If your dishwasher has recently run a cycle, allow 30 minutes for all components to cool completely. Never attempt repairs while the dishwasher is plugged in or powered on.
Why LG QuadWash Spray Arms Get Stuck
Understanding the root cause of your stuck spray arm will help you prevent the problem in the future and ensure a lasting repair. LG QuadWash spray arms typically become stuck due to three primary reasons:
Mineral Scale Buildup in the Bearing
The most common cause of a stuck QuadWash spray arm is mineral scale accumulation inside the bearing that supports the arm’s rotation. Hard water deposits containing calcium and magnesium build up around the bearing housing over time. This mineral scale creates friction that restricts the spray arm’s ability to rotate smoothly. The bearing sits where the spray arm connects to its mounting hub, and even a thin layer of mineral deposits can significantly increase resistance.
Food Debris Lodged in the Rotation Shaft
Food particles, grease residue, and soap scum can accumulate inside the spray arm’s hollow rotation shaft and around the bearing assembly. This debris acts as an abrasive that both prevents smooth rotation and can cause scoring on the bearing surfaces. Particularly problematic are stringy vegetable matter and rice particles that can wrap around the shaft and jam the mechanism.
Cracked or Warped Spray Arm Structure
Physical damage to the spray arm itself—such as cracks, warping, or breaks near the mounting point—can cause the arm to catch on the dishwasher tub walls, the basket, or even the other spray arm. A cracked arm may rotate partway before the crack catches on an obstruction, making the arm appear “stuck” even though the bearing itself functions properly. This is particularly common when heavy pots or pans are loaded improperly and strike the spray arms during the wash cycle.
Identifying Which Spray Arm Is Stuck
LG QuadWash models feature two spray arms: one in the lower basket area and one in the upper basket area. Determining which arm is stuck is essential because the removal and cleaning procedures differ slightly between the two assemblies.
Lower Spray Arm Assembly
The lower spray arm assembly is located at the bottom of the dishwasher’s wash chamber, typically mounted on a short post that rises from the center of the lower basket. To check if the lower arm is stuck, manually try to rotate it by gently grasping the arm and turning it clockwise. It should rotate freely with minimal resistance. If you feel significant resistance or if the arm won’t move at all, the lower arm assembly requires attention.
Upper Spray Arm Assembly
The upper spray arm assembly is mounted beneath the upper basket, suspended from the dishwasher’s upper wall or frame. You’ll need to either remove the upper basket or lower it fully to access this arm. Gently try to rotate the upper arm by hand. The upper arm should spin freely without resistance. Some resistance is normal if the basket is pressing against the arm, so try rotating the arm with the upper basket completely removed or in its lowest position.
If both arms seem stuck, begin your repair with the lower assembly since it’s more accessible and often the primary culprit in QuadWash models.
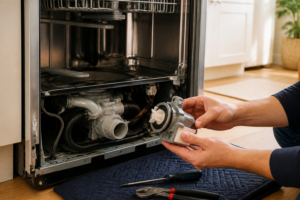
How to Remove LG QuadWash Spray Arms
Removing the Lower Spray Arm Assembly
The lower spray arm assembly in LG QuadWash models uses a distinctive design featuring a center hub with outer arms connected via a twist-lock mechanism rather than traditional screw fasteners.
- Position yourself inside the empty dishwasher: Remove the lower basket completely and set it aside. This provides full access to the spray arm assembly at the bottom of the tub.
- Locate the center hub: In the middle of the lower spray arm assembly, you’ll find a central hub or collar. This hub secures both the upper and lower spray arms in QuadWash models.
- Unscrew the center hub counterclockwise: Using a 1/2-inch wrench or a adjustable wrench, grip the center hub firmly and turn it counterclockwise. On most LG QuadWash models (including the LDFN4542, LDFN4542S, and similar series), this hub removes by turning approximately three to four full rotations. Do not force the hub if it resists—apply steady pressure and allow the hub to release gradually.
- Lift the entire spray arm assembly upward: Once the center hub is loosened and removed, the entire lower spray arm assembly will lift straight up and out of the mounting post. Carefully pull it free from the tub.
- Separate the outer spray arms from the hub: The QuadWash design uses a twist-lock mechanism that differs from standard dishwashers. Each outer arm is connected to the center hub with a quarter-turn twist-lock collar. Hold the center hub steady and grip one of the outer spray arms firmly. Turn the arm clockwise approximately 90 degrees (a quarter turn) until the locking collar disengages. The arm will then pull straight out from the hub. Repeat this process for the second outer arm on the lower assembly.
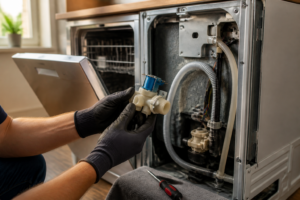
Removing the Upper Spray Arm Assembly
The upper spray arm assembly uses a similar but slightly different mounting mechanism:
- Remove the upper basket: Slide the upper basket completely out of the dishwasher and set it aside on a stable surface.
- Locate the upper spray arm assembly mounting point: Look underneath where the upper basket was positioned. You’ll see the upper spray arm assembly attached to either the rear wall or upper frame of the dishwasher.
- Unscrew the mounting fasteners: The upper assembly may use either a center hub similar to the lower arm (requiring counterclockwise turning) or Phillips-head screws depending on your specific QuadWash model. Check your model number (typically found on a label inside the door jamb) against LG’s service documentation. Most LDFN45-series models use the same center hub system as the lower arm.
- Separate the outer arms from the hub: Using the same quarter-turn twist-lock mechanism, rotate each outer arm clockwise 90 degrees to disengage the locking collar, then pull the arm free from the hub.
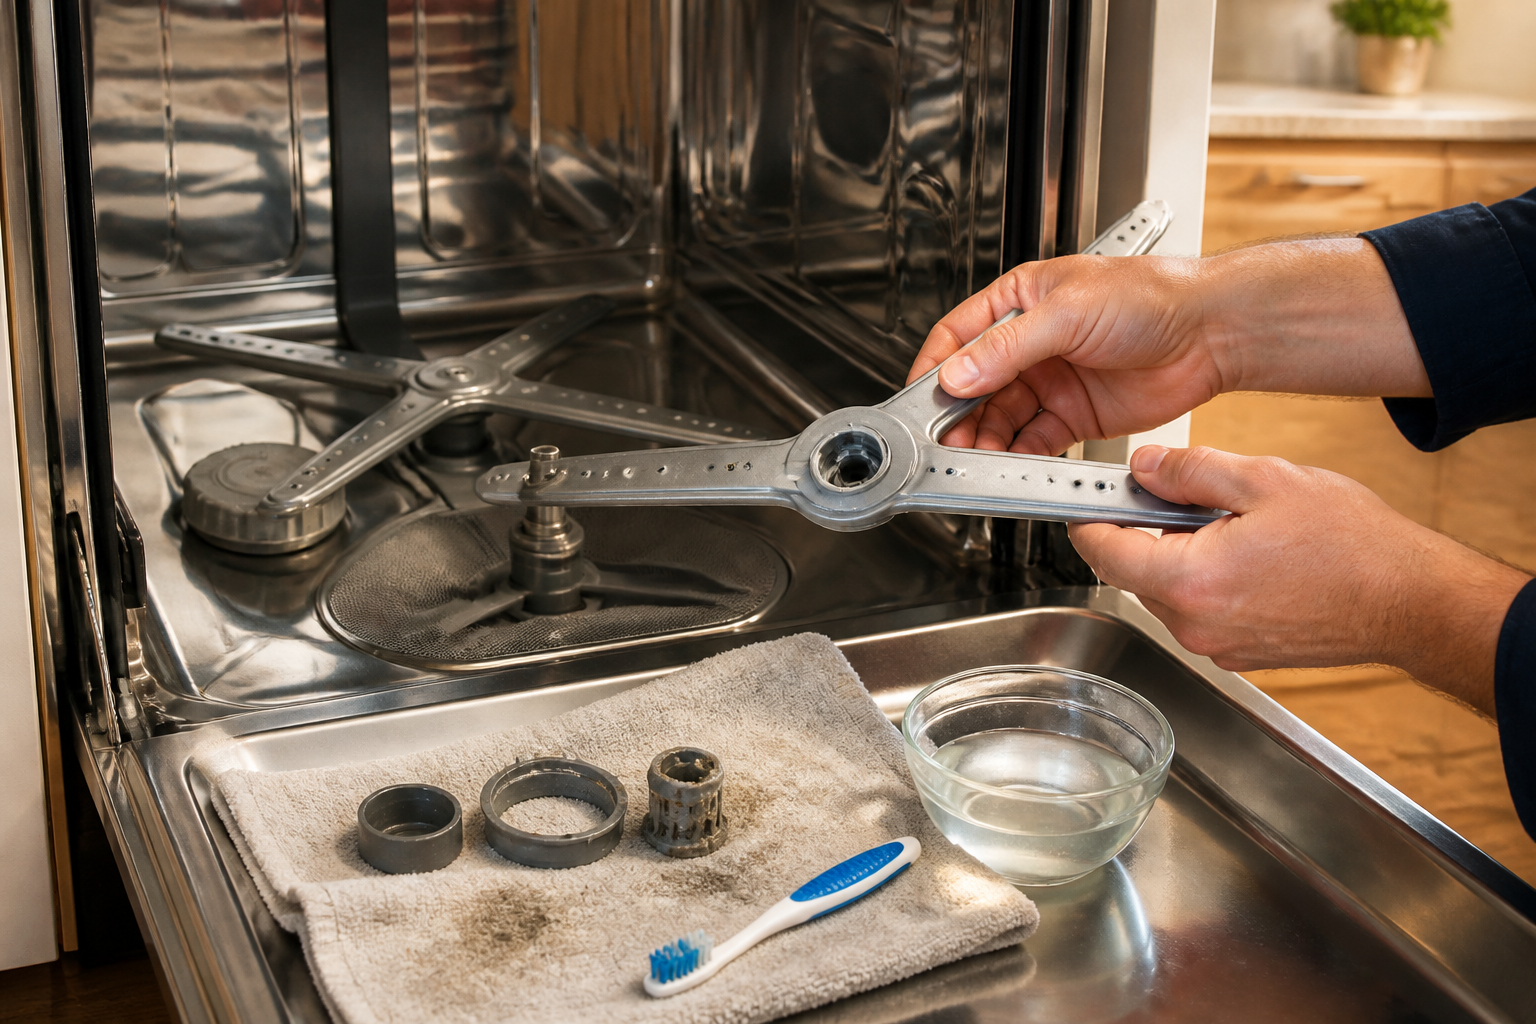
Cleaning the Spray Arm Bearings and Shaft
Once you’ve removed the spray arm assembly, cleaning is usually the most effective solution for stuck arms.
Soaking in White Vinegar Solution
White vinegar’s mild acidity effectively dissolves mineral scale deposits without damaging plastic components:
- Fill a large container with white vinegar: Use a bowl or bucket large enough to fully submerge the spray arm assembly. Pour undiluted white vinegar into the container until it’s approximately four to six inches deep. This typically requires about two to three cups of vinegar for a complete lower spray arm assembly with both outer arms attached.
- Submerge the entire assembly: Place the complete spray arm assembly (with or without the outer arms attached) into the vinegar solution. Ensure all parts are completely covered by the liquid.
- Soak for a minimum of two hours: For light mineral buildup, two hours of soaking will suffice. For heavy scaling visible as white, tan, or brown crusty deposits, soak for four to six hours or even overnight. The longer soak time allows the vinegar’s acidity to penetrate and dissolve stubborn deposits.
- Agitate the assembly periodically: Every 30 to 60 minutes, carefully rotate the spray arms back and forth by hand (even if they resist slightly). This agitation helps work the vinegar into the bearing crevices and helps break up scale deposits. You may notice the resistance decreasing as the vinegar works.
- Remove and inspect the bearing area: After soaking, remove the assembly and examine the central bearing area where the arms connect to the hub. Look for any remaining white, tan, or chalky residue. If the bearing area appears clean (shiny plastic with no deposits), the mineral scale has dissolved successfully.
- Flush with fresh water: Run the spray arm assembly under warm tap water for 30 seconds to one minute, paying special attention to flushing the central bearing area and the hollow interior of each spray arm. This removes dissolved minerals and any remaining vinegar smell.
- Test the rotation: Before reassembling, manually rotate each spray arm by hand. It should move smoothly without resistance. If you still feel significant friction, repeat the soaking process for an additional two hours.
Removing Debris from the Rotation Shaft
For stuck arms caused by food debris rather than mineral scale:
- Use a flexible wire brush: Insert a bottle brush or flexible plumbing brush into the hollow center of the spray arm. Rotate the brush inside the arm while pulling it in and out to scrub away debris clinging to the interior walls.
- Flush with pressurized water: If available, use a spray bottle with a narrow nozzle to force water through the spray arm’s hollow shaft. This dislodges particles and helps clear the bearing area.
- Check the spray holes: While cleaning, verify that none of the spray holes (small openings along the spray arm that discharge water) are blocked by debris. You should be able to see straight through each hole. Use a toothpick or small wire to clear any blockages.
- Inspect the mounting post: The post that the spray arm rotates upon should be completely smooth and free of debris. Gently wipe it with a damp cloth and examine it for corrosion or scoring.
Inspecting for Cracks or Warping
Physical damage to the spray arm itself requires replacement rather than cleaning:
Visual Inspection
Hold the spray arm assembly up to bright light and carefully examine both the upper and lower surfaces of each arm for:
- Visible cracks, breaks, or splits in the plastic
- Areas where the plastic appears thinner, discolored, or melted (indicating warping)
- Sections where the arm appears twisted or no longer symmetrical
- Breaks particularly near the junction where the arm connects to the center hub, as this is a stress point
Testing for Warping
Even cracks that aren’t immediately visible can cause catching and jamming:
- Place the arm flat on a smooth, hard surface: Set each spray arm (while still attached to the hub) on a flat countertop or table. Check if the arm lies completely flat or if there are areas where it’s warped upward or downward.
- Rotate the arm through a full 360-degree cycle: Manually rotate the spray arm by hand while watching for any areas where the arm catches or binds. Listen and feel for resistance patterns. Consistent resistance indicates bearing problems, while sudden catching at specific points suggests warping or a crack.
- Examine the hub connection: Look closely at where each outer spray arm connects to the center hub via the twist-lock mechanism. This connection point often shows cracks first due to stress during normal operation.
When to Replace vs. Repair
If you identify any cracks, severe warping, or melting, the affected spray arm must be replaced. Cracked arms cannot be reliably repaired by homeowners and will continue to cause problems. Do not attempt to use super glue or other adhesives, as these repairs will fail and potentially damage your dishwasher further.
LG QuadWash Spray Arm Part Numbers and Replacement
If your spray arm is cracked or severely warped and cannot be repaired by cleaning, you’ll need to order replacement parts. LG QuadWash models use model-specific spray arm assemblies, though some parts are interchangeable across similar models.
Common QuadWash Model Series and Part Numbers
For the LDFN4542 and LDFN4542S series (among the most common QuadWash models):
- Lower spray arm assembly complete: Part number AEE73110701 or equivalent (contact LG for your specific model’s current part number)
- Upper spray arm assembly complete: Part number AEE73110702 or equivalent
- Lower spray arm outer arm only (either left or right): Part numbers vary by side and model
- Upper spray arm outer arm only (either left or right): Part numbers vary by side and model
For the LDFC4410 and LDFC4410S series:
- Lower spray arm assembly: Part number AEE72910203 (subject to availability and current LG part designations)
- Upper spray arm assembly: Part number AEE72910204 (subject to availability and current LG part designations)
How to Find Your Exact Part Number
Locate your dishwasher’s model number on the rating plate inside the door jamb (open the door fully and look on the upper left or right interior frame). This number is typically in the format “LDFN” or “LDFC” followed by four digits. Contact LG customer service with this model number, or visit LG’s official parts website to download your model’s parts diagram and locate the precise part numbers for replacement spray arms.
Once you’ve ordered the replacement spray arm assembly, installation is straightforward—simply reverse the removal process by reattaching the outer arms to the new center hub using the twist-lock mechanism and reinstalling the assembly in your dishwasher.
Reassembling the Spray Arm Assembly
After cleaning and confirming all parts are damage-free, reassemble the QuadWash spray arm system correctly:
Reattaching Outer Arms to the Center Hub
- Orient the first outer arm toward the center hub: Hold the center hub steady in one hand. Position one of the outer spray arms so its mounting socket aligns with the twist-lock collar on the hub.
- Insert and rotate clockwise: Push the outer arm fully onto the hub connection point, then rotate it counterclockwise approximately 90 degrees (a quarter turn) until you hear or feel a slight click. This click indicates the twist-lock collar has engaged fully. The arm should now be locked firmly in place and not pull off with gentle tugging.
- Repeat for the second outer arm: Perform the same insertion and quarter-turn rotation for the second outer spray arm on the same assembly.
- Verify both arms are locked: Test that neither arm can be twisted or pulled off. Both should be securely attached to the center hub.
- Test free rotation: Grasp the hub and gently rotate the entire assembly 360 degrees. Both outer arms should rotate smoothly without resistance or grinding sensations. There should be no catching or binding.
Reinstalling the Lower Spray Arm Assembly
- Position the assembly above the mounting post: Locate the mounting post at the center bottom of your dishwasher’s wash chamber. Hold the reassembled spray arm assembly above this post with both outer arms pointing outward.
- Lower the assembly onto the post: Carefully slide the center hub of the spray arm assembly straight down onto the mounting post. The assembly should sit securely on the post with minimal gap between the hub and the top of the post.
- Reinstall the center hub fastener: Using your wrench, thread the center hub fastener clockwise onto the mounting post. Turn firmly until snug but do not over-tighten, which can crack the plastic hub. The hub should feel secure and the assembly should not wiggle.
- Reinstall the lower basket: Slide the lower basket back into its guides in the dishwasher, ensuring both sides seat evenly.
- Final rotation test: Manually rotate both lower spray arms one full 360-degree rotation. They should move smoothly without resistance. Confirm that the outer arms do not contact the basket or tub walls during rotation.
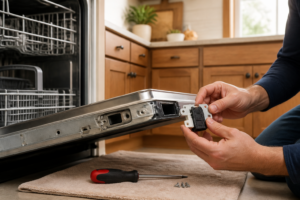
Reinstalling the Upper Spray Arm Assembly
- Position the assembly at the mounting point: Align the center hub of the spray arm assembly with the mounting location beneath where the upper basket normally sits.
- Secure with fasteners: Reinstall the center hub fastener (or Phillips screws, depending on your model) and turn clockwise until snug.
- Reinstall the upper basket: Slide the upper basket back into its mounting guides, ensuring it seats evenly on both sides.
- Final rotation test: Manually rotate both upper spray arms through a complete 360-degree rotation. Confirm smooth movement without catching or grinding.
If Spray Arms Rotate Freely But Dishes Remain Dirty
Even after successfully restoring spray arm rotation, you may find that dishes still aren’t being cleaned effectively. This typically indicates clogged spray holes rather than stuck arms.
Unclogging
Recommended Parts & Tools
Replacement Upper Spray Arm for LG Dishwashers
If your spray arm is cracked, damaged, or the holes are clogged beyond cleaning, you’ll need a genuine replacement part. This OEM spray arm is designed specifically for LG QuadWash models and ensures proper water distribution during the wash cycle. Check current pricing on Amazon.
Multi-Tool Appliance Repair Kit with Screwdrivers
Removing the spray arm bracket requires the right screwdrivers and tools to avoid stripping screws or damaging plastic components. This comprehensive kit includes multiple bit types and specialized appliance tools needed to safely disassemble your dishwasher. Check current pricing on Amazon.
White Vinegar and Baking Soda Cleaning Kit
Mineral deposits and food debris clogging the spray arm holes can be dissolved using vinegar and baking soda, which are safe and effective for dishwasher maintenance. This natural cleaning combination removes buildup without harsh chemicals that could damage seals or plastic parts. Check current pricing on Amazon.
The Replacement Upper Spray Arm That Saves You from Disassembly Guesswork
If cleaning and manual rotation don’t free up the stuck spray arm, you’re usually looking at a worn bearing or cracked arm body—problems that can’t be fixed in place. Ordering the right replacement part means you skip the troubleshooting dead-end and get back to clean dishes in an afternoon.
What works
- Fits the LG QuadWash upper position directly—no adapter games or forcing parts that almost fit.
- The bearing assembly spins freely out of the box, confirming immediately whether your original arm was the actual failure point.
- Installation takes about 10 minutes once you’ve removed the racks; the snap-fit connection is tight enough to hold but not so stubborn that you need a second set of hands.
What doesn’t
- Won’t solve stuck-arm problems caused by food debris or mineral buildup in the spray holes—you still need to clean the filter basket and wash arm inlet first.
- Model numbers matter; LG made different spray arm assemblies across their QuadWash lineup, so verify your machine’s exact model before ordering.
I’ve had homeowners order this part only to discover their arm was actually jammed by a popcorn kernel wedged in the bearing—30 seconds of vinegar soak solved it. Always run the cleaning steps in the guide first, and only pull the trigger on a replacement if the arm physically won’t budge after soaking and manual rotation. Replacement Upper Spray Arm for LG Dishwashers
This post contains affiliate links. As an Amazon Associate, I earn from qualifying purchases at no extra cost to you.