Samsung DW80T5040US Drain Pump Replacement — My Complete Repair Guide
If your Samsung DW80T5040US is leaving standing water in the bottom, making a loud grinding noise during the drain cycle, or throwing an error code like IE or OE, you’re looking at a failed drain pump. I’ve fixed this on at least a dozen Samsung DW80T5040US units, and honestly, it’s one of the most common wear items on this particular model. The good news? I’ll walk you through exactly what I do, and you can handle this yourself in about an hour and a half.
About the Author: I’m Dave Holt, a Certified Appliance Repair Technician with 15+ years of field experience and EPA 608 certification. I’ve repaired thousands of appliances across the country. My goal is to help you fix it yourself and save a couple hundred dollars.
Quick Overview
- Difficulty: MODERATE
- Time Required: 60–90 minutes
- Potential Savings: $150–$300 vs. a service call
- Special Tools: None beyond standard hand tools
Symptoms That Tell Me It’s This Problem
- Standing water in the tub after a cycle. When I see this on a Samsung DW80T5040US, the first thing I check is whether the drain pump is actually spinning. If water sits there and the pump sounds silent, we’ve found our culprit.
- Loud grinding or squealing during the drain phase. This usually means the pump motor is running but there’s either a blockage inside the pump housing or the impeller is cracked. On the DW80T5040US, I’ve seen both.
- Error codes IE or OE. Samsung’s display on the DW80T5040US will flash these when the drain pump fails to do its job within the expected timeframe. OE means “drain error” on this model.
- Water leaking from beneath the dishwasher. A cracked pump housing or loose connector on the Samsung DW80T5040US can cause slow seepage underneath the unit. Check the floor around the kickplate area first.
- Pump hums but doesn’t drain. The motor is energized but the impeller isn’t turning. This usually means a jam or a seized impeller bearing inside the pump assembly itself.
- No power to the pump at all. The display is fine, the cycle runs, but the pump never activates. Before replacing the pump, I always verify the drain solenoid relay on the control board is sending voltage—but on the DW80T5040US, a dead pump is more common.
⚠️ Safety Warning — Read Before You Touch Anything
The very first thing I do—every single time—is unplug the Samsung DW80T5040US from the wall outlet. There are live 120V terminals inside, and I’ve seen techs get a nasty surprise. Second, turn off the water supply shutoff valve (usually under the sink) and let any remaining water in the lines drain into a bucket. The pump area will still have residual water, so have towels ready. Before you reconnect power at the end, make sure your hands and the interior are completely dry. Electricity and water don’t mix, and neither do shortcuts and a functioning dishwasher.
Parts You’ll Need
- Drain Pump Assembly — OEM Part #: DD82-01624A — This is the complete pump unit for the Samsung DW80T5040US; it includes the motor, impeller, and housing. Do not substitute a generic pump; Samsung’s geometry and connector type are specific to this model.
- Pump Mounting Gasket or Seal — OEM Part #: DD82-01625A (if needed separately) — Some versions come pre-sealed; check your pump before ordering. This dishwasher has a rubber gasket that sits between the pump and the sump cavity on the DW80T5040US.
- Drain Hose (Optional) — OEM Part #: DD62-00462A — If your hose shows cracks or has been bent for years, this is a good time to replace it. A leaking hose upstream of the pump can make the pump look bad when it’s not.
- Hose Clamps — OEM Part #: varies; get two stainless steel 1-inch hose clamps — Standard replacements for the Samsung DW80T5040US drain connections if the old ones are corroded or missing.
Tools Required
- Multimeter set to Rx1 (continuity) or voltage setting
- 1/4″ and 3/8″ nut drivers (or a socket set)
- Phillips and flathead screwdrivers (standard and medium sizes)
- Flashlight or headlamp (you’ll be working in tight spaces)
- Adjustable wrench or pliers for hose clamps
- Towels and a bucket (for residual water)
- Wire strippers (optional, but handy if you need to test connectors)
Step-by-Step: How I Replace the Drain Pump on the Samsung DW80T5040US
Step 1: Unplug the Dishwasher and Turn Off Water Supply
Pull the power cord out of the wall outlet—I don’t trust a breaker switch alone when I’m working on electrical components. Then locate the water supply shutoff valve, usually found on the hot water line under the sink or in the basement. Turn it clockwise until it stops. Open the door on the Samsung DW80T5040US, start a drain cycle, and let it run for 10 seconds, then cancel. This depressurizes the line and allows water to drain from the fill valve.
Pro Tip from Dave: Don’t skip the depressurize step on the Samsung DW80T5040US. That residual pressure can push an extra cup of water out when you disconnect the inlet hose, and it makes cleanup messy.
Step 2: Remove the Lower Front Panel (Kickplate)
Look at the front bottom of the Samsung DW80T5040US—there’s a horizontal kickplate that covers the area beneath the door. It’s usually held on by two Phillips screws, one on each side of the unit, located about 3 inches up from the floor. Remove these screws and gently pull the kickplate straight toward you. It may have a thin gasket; don’t tear it. Set the kickplate aside. You should now see into the undercarriage where the pump, solenoid, and drain hose connections live.
Step 3: Locate and Disconnect the Drain Pump
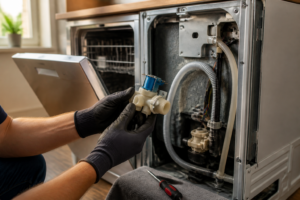
Inside the Samsung DW80T5040US, look toward the rear-left side of the interior cavity beneath the tub. You’ll see a black cylindrical pump assembly about 3 inches long. There are two electrical connectors on top of the pump—one white and one gray, typically. Gently squeeze the clip on each connector and pull straight back to disconnect them. You may also see a small green ground wire; take a photo with your phone before disconnecting anything. Now locate the two hoses connected to the pump: the inlet from the sump (lower connection) and the outlet to the drain line (upper connection). Both have hose clamps. Turn each clamp counterclockwise with your nut driver to loosen, then slide them up the hoses.
Pro Tip from Dave: Take a photo of the pump connectors and hoses before you start disconnecting on the DW80T5040US. The white connector is always power; the gray is common/return. If you swap them, the pump won’t run and you’ll think you have another bad unit.
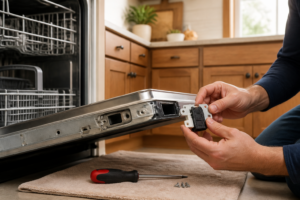
Step 4: Remove the Pump Mounting Bolts
The drain pump on the Samsung DW80T5040US is held in place by two Phillips screws or 1/4″ bolts (usually Phillips on this model) that attach to the sump basin directly beneath the tub. You’ll feel around the sides of the pump body—one bolt is typically on the left side and one on the right, roughly at the 9 and 3 o’clock positions when looking at the pump head-on. Remove both screws. The pump should now be free, though it may stick slightly due to the gasket seal. Do not force it; gently rock it side to side if needed. Slide it straight down and out toward you, being careful not to kink the remaining hose connections.
Step 5: Disconnect the Final Hoses and Pull the Pump Free
Once you’ve removed the bolts, gently pull the pump toward you while supporting the inlet and outlet hoses. You’ll now slide each hose off the pump connections. The inlet (the one coming from the sump) usually requires a firmer tug; it’s often pressed on. The outlet slides off more easily. Set the old pump aside—this is the component that failed. You should have two rubber hoses in your hands now, and they should be empty (or mostly empty; put a towel under them just in case).
Pro Tip from Dave: Before installing the new pump on the Samsung DW80T5040US, inspect those hoses for cracks, splits, or hardening. If they look brittle or show whitish stress marks, replace them now. You don’t want to chase a water leak three months from now.
Step 6: Clean the Sump Area and Gasket Surface
Now is a perfect time to clean out the sump cavity on the Samsung DW80T5040US. Use a flashlight to peer inside the hole where the pump was sitting. You’ll often find hair, food particles, or mineral deposits that can jam a new pump. Use a damp cloth to wipe the rim and the bottom of the cavity. Grab any debris with needle-nose pliers or your fingers (wearing a glove). Also, check the rubber gasket that sits on the sump—the one the pump bolts down to. If it’s cracked, hardened, or missing, you’ll need to order a replacement gasket (OEM Part #: DD82-01625A) before installing the new pump. If it looks okay, leave it in place.
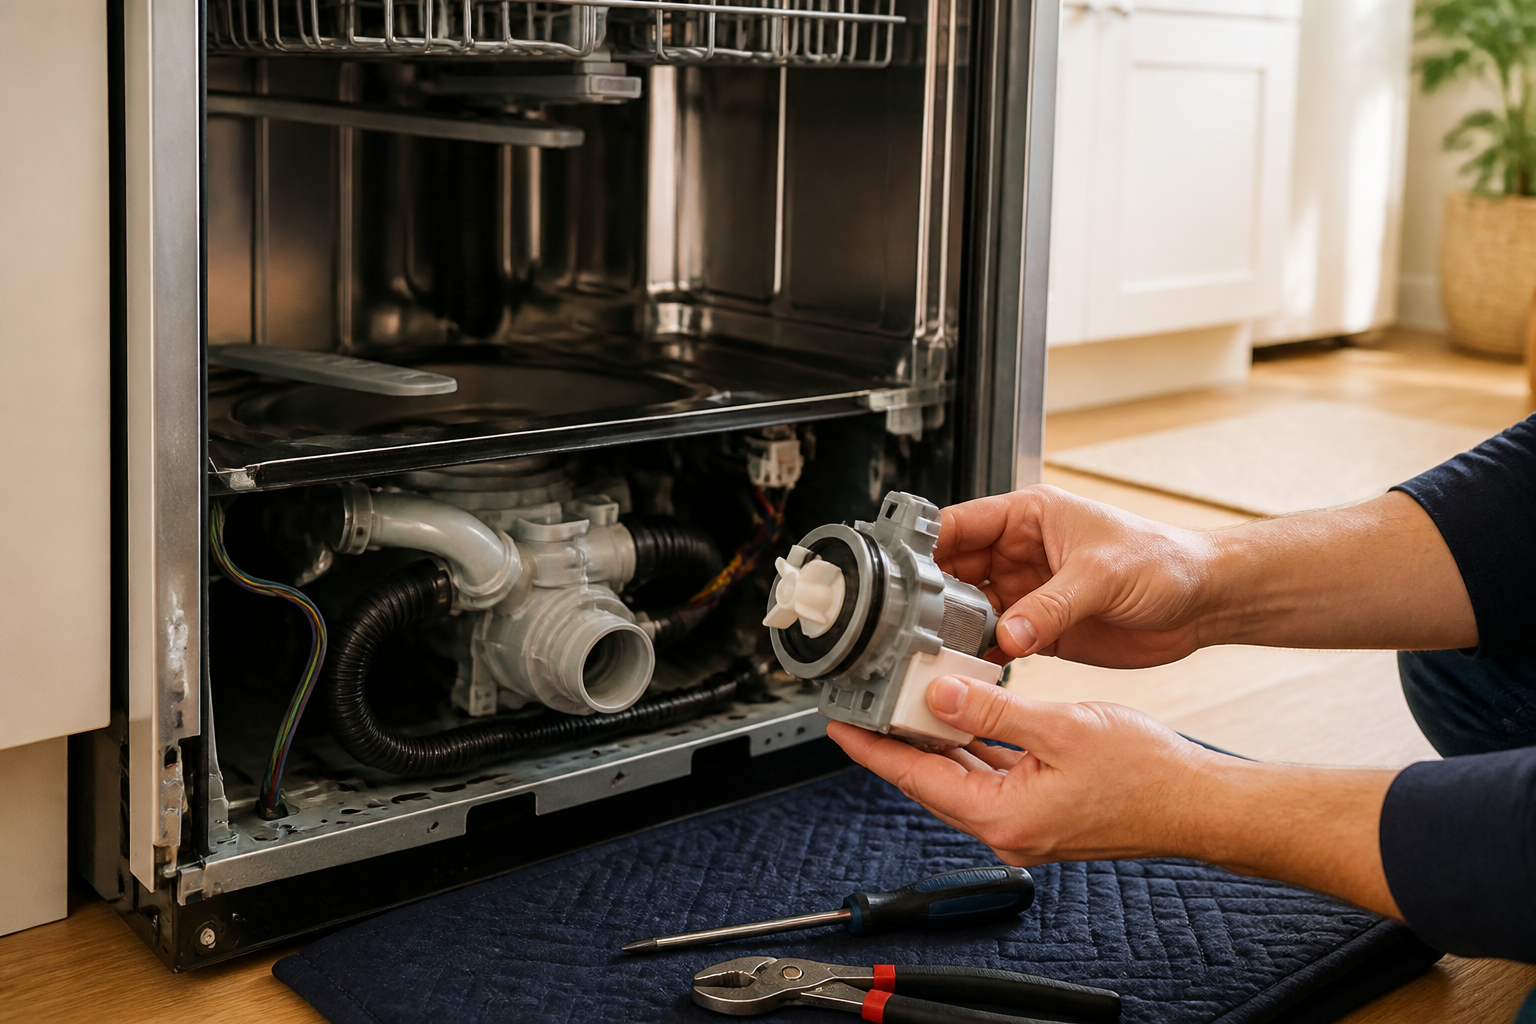
Step 7: Unpack the New Pump and Inspect It
Remove the new drain pump from its packaging. The Samsung DW80T5040US replacement pump (Part #: DD82-01624A) should come with the motor, impeller, and housing intact. The inlet and outlet ports should have protective caps—remove these now and set them aside. Spin the impeller by hand (you’ll see it through one of the ports) to make sure it turns freely and doesn’t rub or grind. If it’s stiff or makes noise, you may have a defective replacement; don’t install it yet. The electrical connectors should be clean and dry. If there’s any moisture inside, do not proceed—contact the supplier for a replacement.
Step 8: Install the New Pump Into the Sump
Position the new pump so the inlet port faces toward the sump (the hole at the bottom-center of the tub) and the outlet port faces toward the rear left corner of the Samsung DW80T5040US cabinet where the drain hose exits. Carefully lower the pump into the cavity, aligning the mounting holes with the bolt holes on the sump rim. You should feel it seat against the gasket. Insert the two Phillips bolts (or screws) and tighten them with your Phillips screwdriver. Don’t over-tighten; you’re aiming for snug, not cranked. I usually tighten them in an X pattern—top-left, then bottom-right, then back to top-left for a final quarter turn. This ensures even pressure on the gasket.
Step 9: Reconnect the Drain Hoses
Push the inlet hose (the one from the sump) firmly onto the lower inlet port of the new pump. You should feel it seat with a slight resistance. Slide the hose clamp down over the connection and tighten it with your nut driver until snug (quarter-turn past hand-tight; don’t overtighten or you’ll split the hose). Now connect the outlet hose to the upper outlet port on the pump. This one usually slides on more easily. Clamp it the same way. Double-check that both clamps are snug and that neither hose is kinked or pinched between the pump and the cabinet wall. A kinked hose will defeat a brand-new pump in short order.
Pro Tip from Dave: On the Samsung DW80T5040US, the outlet hose occasionally rubs against the cabinet frame if not positioned correctly. Before you push the kickplate back on, bend it slightly away from the frame. A hole rubbed through that hose within a year would be a frustrating call-back.
Step 10: Reconnect the Electrical Connectors
Locate the two electrical connectors hanging near the pump on your Samsung DW80T5040US. The white connector (power) and the gray connector (common) should both be clean and dry. Align the white connector with the matching port on top of the pump and push firmly until you hear or feel a click. Do the same with the gray connector. Tug gently on each to confirm they’re seated. If you have a green ground wire (and you likely do on the DW80T5040US), ensure it’s still attached to the pump mounting bracket or to a clean metal surface on the sump rim. A loose ground can cause the pump to behave erratically.
Step 11: Reinstall the Kickplate
Before sealing everything up, visually inspect the entire pump area one more time. Make sure no hoses are pinched, no bolts are loose, and all connectors are fully seated. Check that the gasket around the pump is in contact with the sump rim all the way around. Once you’re satisfied, slide the kickplate back into the frame at the bottom front of the Samsung DW80T5040US. Align the screw holes on each side and insert the two Phillips screws you removed earlier. Tighten them snugly but not aggressively—you can crack the plastic if you over-torque.
Pro Tip from Dave: Once the kickplate is back on the Samsung DW80T5040US, do a final visual check by looking up underneath from the front. Make sure no hoses are sticking out or pinched between the kickplate and the frame. I’ve had customers re-pinch a hose right after I left because they didn’t verify.
Step 12: Test the Repair
Turn the water supply shutoff valve back on (counterclockwise). Then plug the Samsung DW80T5040US back into the wall outlet. Close the door and select a normal wash cycle. Let the dishwasher fill, wash, and begin the drain cycle. Watch and listen for the pump to activate—you should hear a brief hum followed by the sound of water draining. Open the door midway through the drain cycle and check that water is actively leaving the tub. If the water drains completely and the cycle completes without error codes, you’ve done it right. Run one more full cycle to be sure. If an OE or IE error appears on the display, stop and proceed to the troubleshooting section below.
Troubleshooting — If It Still Isn’t Working
- Water still pools in the bottom of the tub after installation. This usually means the pump connectors aren’t fully seated, or the pump itself is defective (rare, but it happens). Power off, unplug, and re-seat the white and gray connectors on the pump. Ensure they click. If water still pools after another cycle, the pump may be DOA. Contact the supplier for a replacement—don’t install a second bad pump; something else is at fault.
- Pump makes a loud grinding noise and doesn’t drain. You likely have debris lodged in the impeller. I know we cleaned the sump, but sometimes a hard particle gets past. Power off, unplug the Samsung DW80T5040US, remove the kickplate again, and try to spin the impeller by hand (looking through the inlet port). If it’s jammed, you’ll feel resistance. The only fix is to remove the pump and either clean out the blockage or replace the pump.
- Water leaks from under the dishwasher. Check the two hose clamps beneath the pump. A loose clamp is the most common culprit. Tighten each one a half-turn with your nut driver. If the leak continues, one of the hoses may be split. You’ll need to replace the leaking hose. If the leak is coming from around the pump itself, the gasket may not be seated properly; remove the pump and ensure the gasket on the sump rim is clean and fully intact.
- OE or IE error code still appears after pump replacement. This error means the control board is not detecting proper drain operation. The new pump is running, but the board’s timer expired before the water drained. This could mean the pump is weak (a defective unit), the drain line is clogged downstream of the pump, or the float switch inside the tub isn’t triggering properly. Use a multimeter to test continuity on the pump connectors while the unit is powered and running a drain cycle. If there