
⚠️ Safety Warning
Before beginning any repair work on your GE Profile Opal ice maker, ensure the unit is unplugged from the electrical outlet for at least 30 minutes to allow internal components to cool down. Water and electricity are a dangerous combination – always work with dry hands and keep the work area free of standing water. Wear safety glasses when working with small components and hoses under pressure. If you smell gas, detect electrical burning odors, or are uncomfortable with any step in this process, contact a qualified appliance repair technician immediately.
Understanding Water Pump Failure in GE Profile Opal Ice Makers
The water circulation pump is the heart of your GE Profile Opal nugget ice maker, responsible for moving water through the system to create those coveted chewable ice nuggets. When this critical component fails, your ice production stops entirely, leaving you with nothing but frustration and warm drinks.
Common Symptoms of Water Pump Failure
Identifying a failed water pump early can save you time and prevent additional damage to your ice maker. Watch for these telltale signs:
- No water flowing over the evaporator cylinder: During normal operation, you should see water cascading over the stainless steel evaporator. If the pump fails, this water flow stops completely.
- Continuous humming or buzzing noise: A failing pump motor may produce unusual sounds as it struggles to move water through the system.
- Complete cessation of ice production: Despite the unit running through cycles, no ice nuggets are produced.
- ADD WATER light illuminated with full reservoir: The sensor detects insufficient water flow even when the tank is properly filled.
- Pump cycling on and off repeatedly: You may notice the pump starting and stopping in rapid succession without maintaining consistent water flow.
- Visible water leaks around the pump area: Internal pump seal failure can cause water to accumulate beneath the unit.
Identifying Your Opal Model Version
Before ordering replacement parts, you must determine whether you own an Opal 1.0 or Opal 2.0 model, as the pump configurations and part numbers differ significantly.
Opal 1.0 Identification
- Model numbers: OPAL01, GE-OPAL01
- Round, cylindrical water reservoir design
- Single LED ring around the power button
- Manufacturing dates: 2018-2019
- Water pump part number: WR02X26069
- Pump specifications: 12V DC, 0.8A, centrifugal design
Opal 2.0 Identification
- Model numbers: OPAL02, GE-OPAL02
- Rectangular water reservoir with side-fill design
- Multiple LED indicators including WiFi connectivity status
- Manufacturing dates: 2020-present
- Water pump part number: WR02X32694
- Pump specifications: 12V DC, 1.0A, improved impeller design
Check the model sticker located on the back panel near the power cord for definitive identification. The manufacturing date code follows the format MMYY (month/year).
Sourcing the Replacement Water Pump
Obtain the correct replacement pump by ordering directly from GE Appliance Parts or authorized dealers using the part numbers listed above. Generic aftermarket pumps are not recommended as they may have different flow rates or electrical specifications that could damage your ice maker’s control board.
When ordering, verify the part number matches your model exactly. The pump assembly includes the motor, impeller housing, and electrical connector. Expect to pay between $45-65 for an OEM replacement pump.
Required Tools and Materials
Gather these tools before beginning the repair to ensure smooth progress:
- Phillips head screwdriver (magnetic tip recommended)
- Torx T20 driver bit
- Needle-nose pliers
- Clean absorbent towels (at least 4-5)
- Small container for screw storage
- Flashlight or work light
- Digital camera or smartphone for reference photos
- Replacement water pump (correct part number for your model)
- Silicone-safe lubricant (optional, for hose reinstallation)
Step-by-Step Water Pump Replacement Process
Step 1: Preparation and Water Drainage
🔨 Pro Tip from Dave
On the Opal, the pump inlet screen is notorious for harboring mineral scale that looks clear and harmless but is thick enough to starve the pump of flow — before you condemn the pump itself, pull that screen and hold it up to a light, because I’ve seen brand-new replacement pumps fail within weeks because the tech skipped cleaning it. Soak that screen in undiluted white vinegar for 20 minutes while you have the unit open, and you’ll save yourself a callback.
- Unplug the ice maker from the electrical outlet and wait 30 minutes for internal components to cool.
- Remove the water reservoir and empty it completely.
- Remove the ice storage bin and discard any remaining ice.
- Allow the unit to reach room temperature, approximately 30-45 minutes.
- Place absorbent towels around the work area to catch any residual water.
Step 2: Accessing the Internal Components
- Carefully move the ice maker to provide access to the back panel. The unit weighs approximately 38 pounds when empty.
- Locate the back panel, secured by six Phillips head screws arranged around the perimeter.
- Remove all six screws and store them in your container. The screws are 1/4 inch long with coarse threads.
- Gently lift the back panel away from the unit, being careful not to damage any internal wiring.
- Take a reference photo of the internal layout before proceeding.
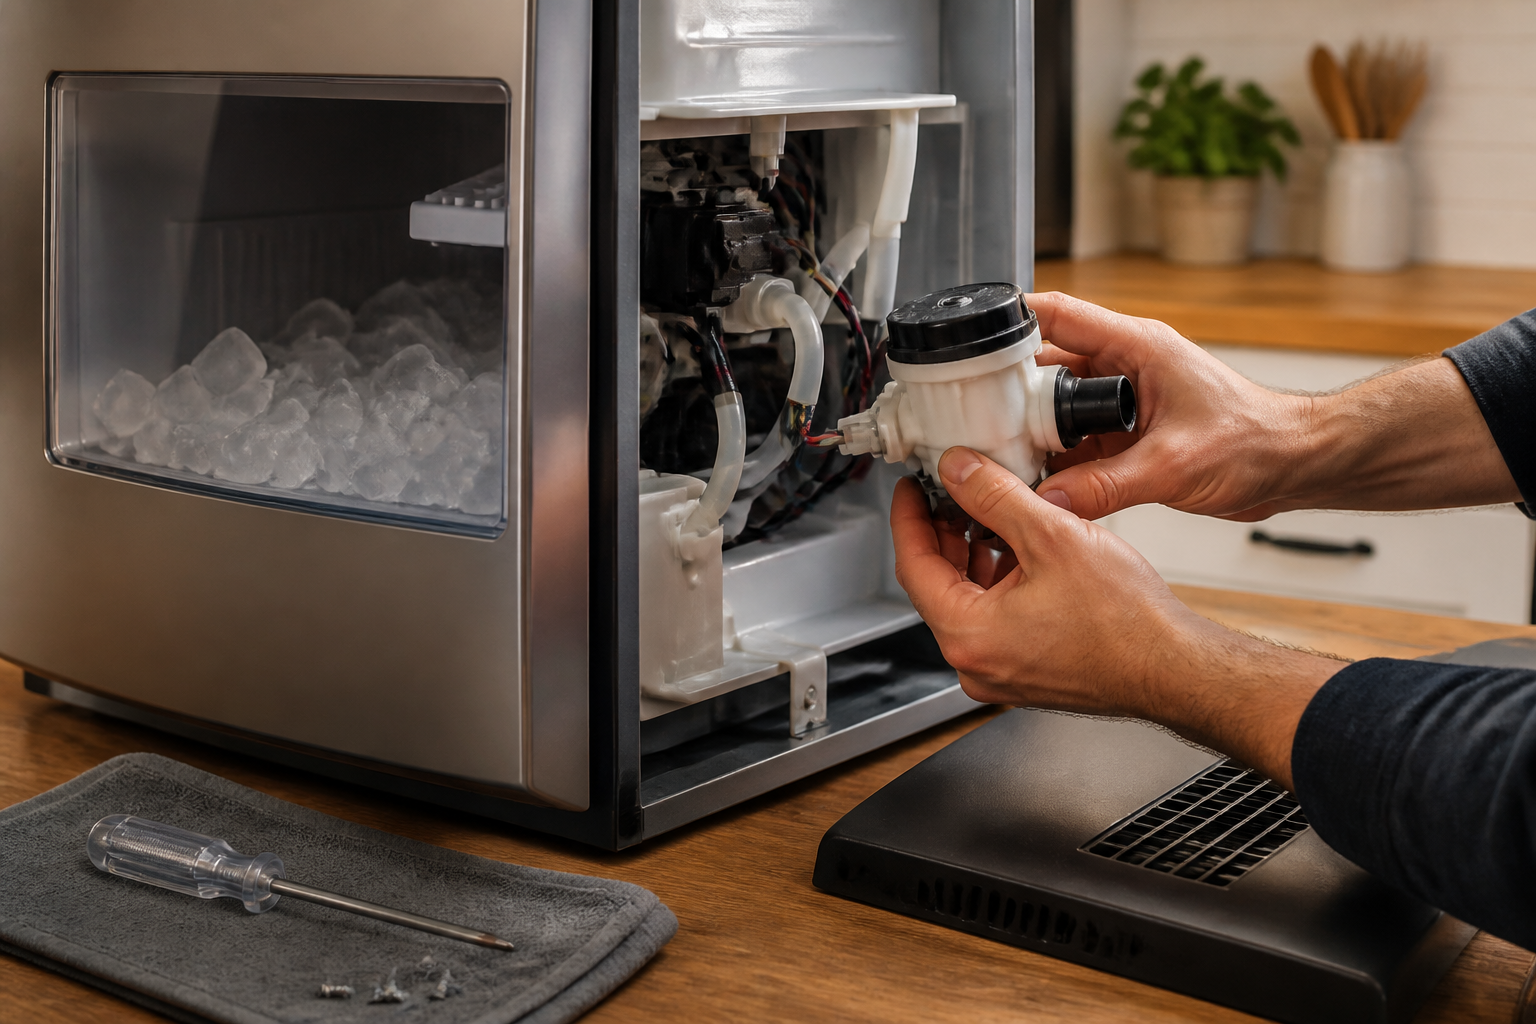
Step 3: Locating the Water Pump
The water pump is located in the lower section of the unit, typically on the right side when viewed from the back. It’s a black cylindrical component approximately 3 inches long and 2 inches in diameter, with two water hoses and one electrical connector.
- Identify the pump by following the water lines from the reservoir connection point.
- Note the inlet hose (coming from the water reservoir) and outlet hose (leading to the evaporator).
- Locate the pump mounting bracket, secured by two Torx T20 screws.
- Identify the electrical connector, typically a white plastic housing with three wires (red, black, and white).
Step 4: Disconnecting the Water Hoses
This step requires careful attention as residual water in the lines will spill out when disconnected.
- Position towels directly beneath the pump area to catch water spillage.
- Using needle-nose pliers, gently squeeze the hose clamp on the inlet hose (reservoir side) and slide it away from the pump connection.
- Carefully twist and pull the inlet hose straight off the pump barb fitting. Expect 2-3 ounces of water to drain out.
- Repeat the process for the outlet hose, noting its orientation for proper reinstallation.
- Take a clear photo showing the hose routing before complete removal.
Step 5: Electrical Disconnection
- Locate the electrical connector attached to the pump motor housing.
- Press the release tab on the connector housing while gently pulling the connector away from the pump.
- Do not pull on the individual wires; always grasp the connector housing itself.
- Inspect the connector for corrosion or damage that might indicate moisture infiltration.
Step 6: Pump Removal
- Using the Torx T20 driver, remove the two mounting screws securing the pump bracket to the chassis.
- The screws are approximately 3/8 inch long with fine threads. Keep track of any washers or spacers.
- Gently lift the pump assembly out of its mounting location.
- Inspect the mounting area for any debris or mineral buildup that should be cleaned before installing the new pump.
Step 7: New Pump Installation
- Unpack the new pump and verify the part number matches your model requirements.
- Compare the new pump’s physical dimensions and connector configuration with the old unit.
- Position the new pump in the mounting bracket, ensuring proper alignment with the screw holes.
- Install the two Torx mounting screws, tightening to finger-tight plus 1/4 turn. Do not overtighten.
- Verify the pump sits level and secure in its mounting location.
Step 8: Electrical and Hose Reconnection
- Connect the electrical connector to the new pump, ensuring it clicks securely into place.
- Gently tug on the connector to verify a solid connection.
- Install the inlet hose (from reservoir) onto the pump’s inlet barb, typically marked with an arrow or “IN” designation.
- Slide the hose clamp over the connection and position it 1/4 inch from the barb end.
- Install the outlet hose following the same procedure, ensuring proper routing to avoid kinks.
- Double-check all connections are secure and properly positioned.
Step 9: System Reassembly
- Replace the back panel, aligning it carefully with the unit’s rear edge.
- Install all six Phillips head screws, tightening in a star pattern to ensure even pressure.
- Reinstall the water reservoir, ensuring it seats properly in its mounting location.
- Replace the ice storage bin and any other components removed during disassembly.
Pump Priming and Initial Testing
A new water pump requires proper priming to establish consistent water flow and remove air bubbles from the system.
- Fill the water reservoir to the maximum fill line with filtered water.
- Plug the ice maker back into the electrical outlet.
- Press the power button to initiate the startup sequence.
- Allow the unit to complete 2-3 full ice-making cycles without interruption. Each cycle takes approximately 15-20 minutes.
- Monitor for proper water flow over the evaporator cylinder during the freezing phase.
- Listen for any unusual noises that might indicate improper installation or air in the system.
- Check for water leaks around the pump area during the first hour of operation.
Post-Installation Performance Verification
After the initial priming cycles, verify these performance indicators:
- Consistent water flow over the evaporator without interruption
- Normal pump operation sound (quiet humming, no grinding or clicking)
- Proper ice nugget formation and harvest into the storage bin
- ADD WATER light functions correctly when reservoir is low
- No water leakage from hose connections or pump housing
Preventive Maintenance and System Cleaning
To maximize the lifespan of your new water pump and prevent premature failure, establish a regular maintenance routine.
Water Line Cleaning Procedure
Mineral buildup and biofilm can restrict water flow and strain the pump motor. Clean the water circulation system monthly:
- Mix a solution of 1 cup white vinegar with 2 cups distilled water.
- Pour the cleaning solution into the water reservoir.
- Run three complete ice-making cycles, discarding all ice produced during cleaning.
- Drain the reservoir completely and refill with fresh distilled water.
- Run two additional cycles with clean water to remove all vinegar residue.
- Inspect the evaporator cylinder for mineral scale and clean if necessary using a soft brush.
Water Quality Recommendations
Poor water quality significantly impacts pump longevity and ice taste:
- Use filtered or distilled water to minimize mineral deposits
- Avoid softened water, which can leave sodium deposits
- Replace water in the reservoir every 3-4 days if not using the ice maker
- Clean the reservoir weekly with mild soap and warm water
Troubleshooting Common Post-Replacement Issues
Pump Not Starting After Installation
If the new pump fails to operate after installation:
- Verify the electrical connector is fully seated and clicked into place
- Check for 12V DC power at the pump connector using a multimeter
- Ensure the water reservoir is properly seated and making electrical contact
- Confirm the unit has completed its initial startup sequence (approximately 5 minutes)
Reduced Water Flow or Intermittent Operation
If water flow appears reduced or inconsistent:
- Check for kinked or pinched water hoses
- Verify hose clamps are not over-tightened, restricting flow
- Ensure the pump inlet is not blocked by debris
- Allow additional priming time for air bubbles to clear the system
Water Leakage After Installation
Address any water leaks immediately to prevent damage:
- Inspect hose connections for proper seating and clamp position
- Verify the pump housing is not cracked (defective new part)
- Check that hose clamps are positioned correctly over the barb ridges
- Ensure mounting screws are not over-tightened, potentially cracking the pump housing
Frequently Asked Questions
How long should a water pump last in a GE Profile Opal ice maker?
Under normal operating conditions with proper maintenance, the water pump should last 3-5 years. Factors affecting lifespan include water quality, frequency of use, and adherence to regular cleaning schedules. Hard water areas may see reduced pump life due to mineral buildup, while units used daily in commercial settings may require replacement every 2-3 years.
Can I use an aftermarket or generic replacement pump?
While aftermarket pumps may physically fit, they often have different flow rates, pressure specifications, or electrical characteristics that can damage the ice maker’s control board or provide insufficient performance. GE designs the pump specifications to match the evaporator cooling capacity and harvest timing. Using non-OEM parts may void your warranty and lead to additional costly repairs.
Why does my pump make noise even after replacement?
New pump noise can result from several factors: air bubbles in the system (requiring additional priming cycles), improper hose routing creating restrictions, over-tightened mounting screws causing vibration, or a defective new pump. Allow 24 hours of operation for air to purge completely. If noise persists, verify all connections and consider the pump may be defective.
How do I know if the pump replacement was successful?
Successful pump replacement is indicated by: visible water flow over the evaporator cylinder during the freeze cycle, normal ice production resuming within 2-3 cycles, quiet pump operation without unusual noises, proper ADD WATER light function, and no water leaks around the pump area. The unit should produce its first ice batch within 30-45 minutes of startup.
What causes premature water pump failure?
Common causes include: mineral buildup from hard water restricting impeller movement, biofilm growth from infrequent cleaning, running the pump dry when the reservoir is empty, electrical surges damaging the motor, and manufacturing defects in early production runs. Regular maintenance and using filtered water significantly extend pump life.
Can I prevent future pump failures?
Yes, preventive measures include: using filtered or distilled water, performing monthly cleaning cycles with vinegar solution, replacing reservoir water every 3-4 days during periods of non-use, avoiding operation with an empty reservoir, and following the manufacturer’s descaling recommendations. These practices can double or triple pump lifespan.
Is this repair covered under warranty?
Pump replacement is typically covered under GE’s limited warranty for the first year from purchase date, and the sealed system (including the pump) may have extended coverage up to 5 years depending on your model and purchase date. Check your warranty documentation or contact GE customer service with your model and serial number for specific coverage information. DIY repairs may affect warranty coverage for related components.
How much does professional pump replacement cost compared to DIY?
Professional repair typically costs $150-250 including parts and labor, while DIY replacement costs $45-65 for the OEM pump plus your time. The repair is moderately difficult but well within most homeowners’ capabilities with basic tools. Consider professional service if you’re uncomfortable with the electrical connections or if multiple components need replacement simultaneously.
When to Call a Professional
Most of the repairs in this guide are within reach for a careful DIYer with basic tools. In my experience, if you’ve replaced the pump and the unit still won’t move water — or if you’re finding corrosion or moisture damage on the control board during disassembly — that’s the point where continuing the DIY repair risks a much costlier outcome, and a certified tech with a proper diagnostic meter needs to take over. When in doubt, a diagnostic service call typically costs $80–$120 and can save you from a misdiagnosis that costs more in parts.
Recommended Parts & Tools
GE Profile Opal Ice Maker Water Pump Replacement Part
This is the exact replacement water pump designed specifically for GE Profile Opal ice makers. The original equipment manufacturer part ensures proper fit and performance when replacing your failed water pump. Check current pricing on Amazon.
Klein Tools 32500 Multi-Bit Screwdriver Set
You’ll need various screwdriver bits to remove the panels and access the water pump assembly inside your ice maker. This comprehensive set includes both Phillips and flathead bits in multiple sizes commonly used in appliance repairs. Check current pricing on Amazon.
Affresh Ice Machine Cleaner
While you have the ice maker disassembled for pump replacement, it’s the perfect time to thoroughly clean the internal components. This cleaner removes mineral buildup and sanitizes the water system to ensure optimal performance after reassembly. Check current pricing on Amazon.


