
⚠️ Safety Warning: Before performing any repairs, unplug your Euhomy ice maker and allow it to sit for at least 30 minutes. Water and electricity are dangerous when combined. Always ensure your hands are dry when handling electrical components. If you smell gas, see sparks, or notice any electrical damage, stop immediately and consult a professional technician.
Understanding Euhomy Ice Maker Error Codes
Euhomy countertop ice makers feature a sophisticated diagnostic system that displays error codes to help identify specific problems. These codes appear on the LED display panel and correspond to different system failures:
- E1 Error Code: Water shortage detected. The water level sensor indicates insufficient water in the reservoir to begin or continue the ice-making cycle.
- E2 Error Code: Ice basket full sensor activated. The infrared sensor detects that the ice basket has reached capacity and stops production to prevent overflow.
- E3 Error Code: Water circulation failure. The most common and complex error, indicating the water is not properly circulating over the evaporator prongs.
- E4 Error Code: Ambient temperature too high. The unit’s internal temperature sensor detects that the surrounding environment exceeds 90°F (32°C), preventing proper ice formation.
- E5 Error Code: Evaporator temperature sensor malfunction. The thermistor responsible for monitoring the evaporator’s temperature has failed or is providing inconsistent readings.
E3 Fault Code Deep Dive: Water Circulation Failure
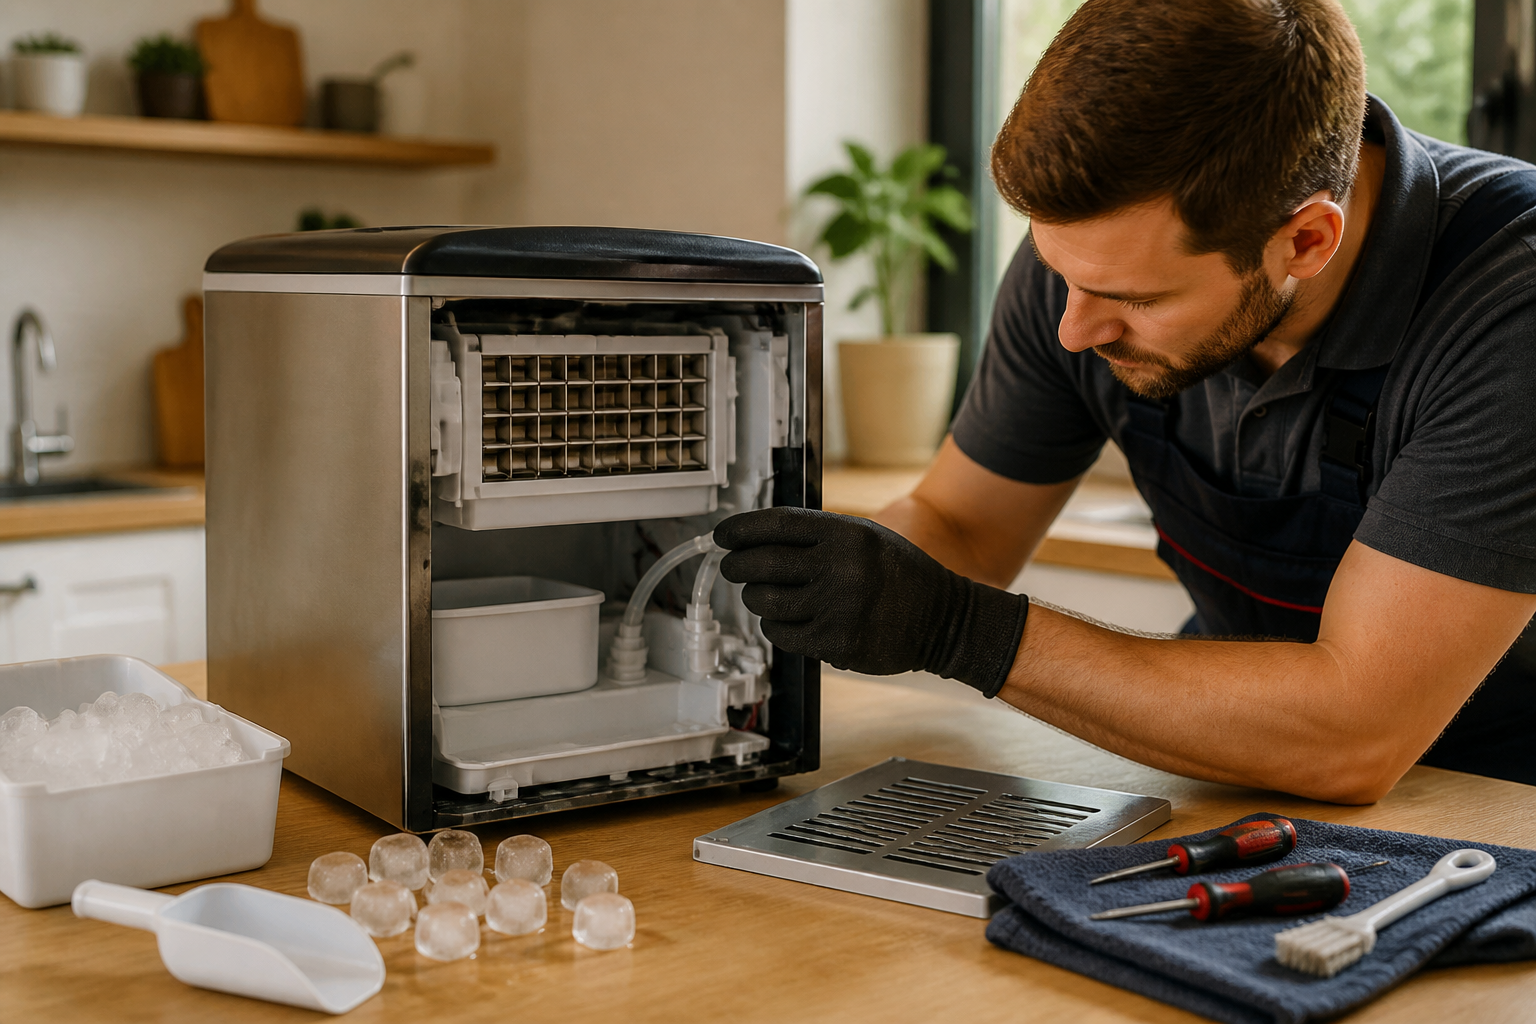
The E3 error code is the most frequent issue Euhomy ice maker owners encounter. This error indicates that water is not properly circulating from the reservoir, through the water pump, up to the distribution system, and over the evaporator prongs where ice forms.
Root Causes of E3 Error Code
Three primary issues trigger the E3 fault code:
- Water Pump Failure: The small centrifugal pump (part number varies by model, typically rated at 12V DC, 3-5 watts) located at the bottom rear of the unit may have failed mechanically or electrically.
- Blocked Water Lines: Mineral deposits, ice blockages, or debris can obstruct the silicone tubing (typically 6mm inner diameter) that carries water from the pump to the distribution tray.
- Flow Sensor Malfunction: The magnetic flow sensor that monitors water circulation may be stuck, damaged, or disconnected from the control board.
Step-by-Step E3 Error Code Repair Process
- Initial Assessment: Remove the ice basket and water reservoir. Inspect the water pump area at the bottom rear of the unit. Look for obvious leaks, disconnected tubing, or visible pump damage.
- Test Water Pump Operation: Fill the reservoir with water and plug in the unit. Press the power button and observe if you can hear the pump running (a quiet humming sound). The pump should activate within 10-15 seconds of starting a cycle.
- Check Pump Connections: Unplug the unit and remove the bottom access panel (typically 4-6 Phillips head screws). Locate the water pump and verify all electrical connections are secure. The pump receives 12V DC from the main control board via a 2-wire connector.
- Test Pump Voltage: Using a multimeter, check for 12V DC at the pump connector while the unit is running. If voltage is present but the pump isn’t running, the pump has failed and needs replacement.
- Inspect Water Lines: Follow the silicone tubing from the pump outlet to the water distribution tray above the evaporator. Check for kinks, blockages, or mineral buildup. The tubing should have a clear internal diameter of 6mm.
- Clean Water Distribution System: Remove the distribution tray (usually held by 2 clips) and flush with warm water. Use a small brush to clean the water outlets that direct flow over each evaporator prong.
- Check Flow Sensor: Locate the magnetic flow sensor in the water line (typically a small cylindrical component with a 3-wire connector). Ensure it’s properly seated and connections are clean and tight.
- Descale the System: Mix 2 tablespoons of white vinegar with 16 ounces of water. Run this solution through the system to dissolve mineral deposits that may be blocking water flow.
- Reassemble and Test: Reinstall all components, fill with fresh water, and run a test cycle. The E3 error should clear if water circulation is restored.
Water Not Cascading Over Evaporator Prongs
When water fails to cascade properly over the evaporator prongs, ice formation becomes impossible or produces malformed ice cubes. This issue may or may not trigger an E3 error code, depending on whether the flow sensor detects the problem.
Diagnosing Water Flow Issues
The Euhomy’s evaporator features 6-9 metal prongs (depending on model) that should be continuously bathed in water during the ice-making cycle. Proper water flow creates a thin film over each prong, which freezes to form hollow ice cubes.
Common Causes and Solutions
- Clogged Water Pump Filter: Remove the small filter screen at the pump intake (located inside the reservoir well). Rinse under warm water and brush away debris. This filter prevents particles from entering the pump but can become blocked with mineral deposits.
- Low Water Level: Even if the water level appears adequate, the pump requires a minimum water depth of 1.5 inches to maintain proper suction. Add water until it reaches the MAX fill line on the reservoir.
- Mineral Buildup in Distribution Holes: The water distribution tray has small holes (typically 1-2mm diameter) above each evaporator prong. Use a thin wire or toothpick to clear these holes of mineral deposits.
- Pump Impeller Damage: If the pump runs but produces weak flow, the plastic impeller may be cracked or have broken fins. This requires pump replacement (typical part cost: $25-40).
- Air Lock in Water Lines: Air bubbles can prevent proper water circulation. Disconnect the water line at the pump outlet and reconnect to purge air from the system.
Ice Maker Not Making Ice At All
When your Euhomy ice maker powers on but fails to produce ice, follow this systematic troubleshooting approach:
Troubleshooting Flowchart
- Power and Display Check: Verify the unit powers on and displays illuminate. If completely dead, check the 12V DC adapter and internal fuse (typically 5A, located on the main control board).
- Water Level Verification: Ensure water level is between MIN and MAX lines. Too little water triggers E1 error; too much can cause overflow issues.
- Ice Basket Position: Confirm the ice basket is properly seated. A misaligned basket prevents the infrared sensor from detecting ice levels correctly.
- Ambient Temperature: Check room temperature. Euhomy units require ambient temperatures between 50-90°F (10-32°C) for proper operation.
- Compressor Function: Listen for the compressor starting (a clicking sound followed by humming). The compressor should cycle on within 2-3 minutes of starting.
- Evaporator Temperature: After 10 minutes of operation, the evaporator prongs should feel cold to the touch (approximately 25-30°F or -4 to -1°C).
- Control Board Status: Check for any error codes on the display. Refer to the error code section above for specific diagnostics.
Ice Too Small or Thin: Water Flow and Temperature Issues
Poorly formed ice typically results from inadequate water flow or incorrect evaporator temperatures. The ice formation cycle should take 8-12 minutes, with water continuously flowing over the prongs while the compressor maintains the evaporator at 25-30°F.
Diagnosis and Correction
- Water Flow Rate: Measure the pump output by disconnecting the water line and catching flow in a measuring cup. Normal output should be 0.5-0.8 liters per minute.
- Water Temperature: Use only room temperature or slightly cool water (50-70°F). Very cold water can shock the system; hot water overworks the compressor.
- Evaporator Cleaning: Scale buildup on evaporator prongs reduces heat transfer efficiency. Clean with a 50/50 vinegar-water solution and a soft brush.
- Refrigerant Issues: If the evaporator doesn’t get cold enough, the sealed refrigeration system may have leaked refrigerant (R134a or R600a). This requires professional service.
- Cycle Timing Adjustment: Some models allow cycle time adjustment via hidden service menus. Consult your specific model’s service manual for accessing these settings.
Cleaning and Descaling Prevention
Regular maintenance prevents most Euhomy ice maker problems. Mineral buildup is the leading cause of water circulation issues and error codes.
Weekly Cleaning Routine
- Empty the ice basket and water reservoir completely
- Wipe down the interior with a mild soap solution
- Clean the water reservoir with warm, soapy water
- Rinse the ice basket thoroughly
- Use a soft cloth to clean the evaporator prongs
- Check and clean the pump intake filter
Monthly Descaling Process
- Mix 2 cups warm water with 2 tablespoons white vinegar
- Fill the reservoir with the descaling solution
- Run 2-3 complete ice-making cycles
- Discard all ice produced during descaling
- Flush the system with fresh water for 2 additional cycles
- Clean the drain plug area and ensure proper drainage
Deep Cleaning Quarterly
Every three months, perform a complete disassembly cleaning. Remove the water distribution tray, disconnect and clean all water lines, and inspect all electrical connections for corrosion. Use a commercial ice machine cleaner (following dilution instructions) for heavily mineralized systems.
When to Replace vs. Repair
Consider the age, cost, and extent of damage when deciding between repair and replacement:
Repair-Worthy Issues
- Water pump failure (replacement cost: $25-40)
- Control board problems (replacement cost: $45-70)
- Clogged water lines and distribution systems
- Flow sensor malfunction (replacement cost: $15-25)
- Ice level sensor issues (replacement cost: $10-20)
Replace Rather Than Repair
- Compressor failure (repair cost exceeds unit value)
- Refrigerant leaks in the sealed system
- Multiple simultaneous component failures
- Units over 5 years old with major component failure
- Extensive internal corrosion or water damage
Cost-Benefit Analysis
If repair costs exceed 60% of a new unit’s price, replacement is typically more economical. Factor in the warranty coverage of a new unit versus the uncertainty of aging components in a repaired machine.
Frequently Asked Questions
Why does my Euhomy ice maker keep showing E3 error after cleaning?
Persistent E3 errors after cleaning usually indicate a failed water pump or flow sensor. Test the pump voltage (should read 12V DC when running) and check for proper flow sensor connections. If the pump receives power but doesn’t operate, replacement is necessary. The flow sensor may also need recalibration or replacement if cleaning doesn’t resolve the issue.
How do I know if the water pump in my Euhomy ice maker is working properly?
A functioning water pump should produce an audible humming sound when operating and generate water flow of 0.5-0.8 liters per minute. You can test by disconnecting the outlet tube and measuring flow into a container. If the pump is silent or produces weak flow despite receiving 12V DC power, it needs replacement.
What causes water to stop cascading over the evaporator prongs suddenly?
Sudden loss of water cascade typically results from clogged distribution holes, pump failure, or air locks in the water lines. Check the small holes in the water distribution tray above each evaporator prong for blockages. Also verify the pump is running and producing adequate flow. Air locks can be cleared by disconnecting and reconnecting the water line at the pump outlet.
How often should I descale my Euhomy ice maker to prevent problems?
Descale monthly in areas with hard water, every 6-8 weeks in moderate water conditions, and quarterly in soft water areas. Use 2 tablespoons of white vinegar per 16 ounces of water for the descaling solution. Signs that descaling is needed include slower ice production, smaller ice cubes, or frequent E3 error codes.
Can I use filtered water to reduce maintenance on my Euhomy ice maker?
Yes, filtered water significantly reduces mineral buildup and extends component life. However, avoid distilled or reverse osmosis water, which can cause sensor problems due to lack of minerals needed for proper electrical conductivity. Standard carbon-filtered or moderately hard water (50-150 ppm total dissolved solids) works best for optimal ice production and minimal maintenance requirements.
When to Call a Professional
Most of the repairs in this guide are within reach for a careful DIYer with basic tools. In my experience, the moment you open this unit and find corrosion on the control board, a compressor that hums but won’t start, or any signs of refrigerant oil residue around the sealed system components, you’ve crossed firmly into professional territory — refrigerant handling requires EPA 608 certification and specialized equipment that no home repair should attempt without. When in doubt, a diagnostic service call typically costs $80–$120 and can save you from a misdiagnosis that costs more in parts.
Recommended Parts & Tools
Ice Maker Cleaning Solution – Nickel Safe Descaler
Many E3 error codes in Euhomy ice makers are caused by mineral buildup in the water lines and sensors. This specialized cleaning solution removes calcium deposits and scale that can trigger false sensor readings and water flow issues. Check current pricing on Amazon.
Water Level Sensor Float Switch Replacement
The water level sensor is a common culprit behind E3 fault codes when it fails to detect proper water levels. This universal replacement float switch is compatible with most countertop ice makers including Euhomy models. Check current pricing on Amazon.
Small Appliance Screwdriver Set
Accessing the water pump, sensors, and internal components of your Euhomy ice maker requires precision screwdrivers. This set includes the exact Phillips and flathead sizes needed to safely disassemble and repair most ice maker models. Check current pricing on Amazon.
Euhomy Ice Maker Water Not Cascading — Causes and Fixes
When your Euhomy ice maker water not cascading issue appears, it means the unit’s internal water pump has stopped circulating water over the evaporator fingers — the vertical metal prongs that freeze water into ice bullets. During a normal freeze cycle, the pump draws water from the reservoir and pushes it upward through a distribution line, where it sheets evenly over those fingers and refreezes layer by layer. If that cascade stops, the fingers either produce hollow, malformed ice or stop making ice entirely. The machine may still run, the compressor may still cool, but without that constant flow of water, the ice-making process breaks down completely.
Common Causes of the Water Not Cascading Problem
Several issues can interrupt the cascade flow in Euhomy countertop and freestanding models. Understanding the root cause before disassembling anything will save you significant time and effort:
- Low water level: The pump intake sits near the bottom of the reservoir. If the water level drops below the minimum line, the pump draws air instead of water, producing a faint gurgling sound with no visible cascade.
- Blocked pump intake screen: A fine mesh screen protects the pump from mineral deposits and debris. Hard water scale and small ice chips are the most frequent culprits, and even partial blockage can reduce flow enough to halt the cascade.
- Kinked or pinched tubing: The soft silicone tubing running from the pump to the water distribution tray can kink if the unit was recently moved or if internal components shifted. A kink as small as a few millimeters is enough to stop flow entirely.
- Failed or seized water pump: The pump itself is a small DC motor-driven component. Extended use, mineral buildup inside the pump housing, or a voltage irregularity can seize the impeller or burn out the motor windings.
- Clogged water distribution tray: The tray or nozzle that spreads water across the evaporator fingers can accumulate limescale, redirecting or completely blocking the cascade stream even when pump output is normal.
Step-by-Step Fix: Restoring Water Cascade Flow
Work through the following steps in order, from the simplest to the most involved. Power the unit off and unplug it before reaching inside the reservoir or touching any internal components.
- Step 1 — Check and refill the water level: Remove the ice basket and look at the reservoir. Fill it to the MAX line using clean, filtered water if possible. Plug the unit back in, start a cycle, and watch whether water flows over the evaporator fingers within 60 to 90 seconds. If cascade resumes, low water was the only problem.
- Step 2 — Clean the pump intake screen: With the unit unplugged, empty the reservoir completely. Locate the small cylindrical or rectangular screen covering the pump intake at the reservoir floor. Gently pull or unclip it, then rinse it under warm running water. Use a soft toothbrush to dislodge any white mineral scale. Soak the screen in a 50/50 white vinegar and water solution for 10 to 15 minutes if buildup is heavy, then rinse thoroughly before reinstalling.
- Step 3 — Inspect tubing for kinks: Trace the silicone tubing from the pump outlet up toward the distribution tray. Look and feel for any sharp bends, pinch points, or areas where a clip may have shifted and compressed the tube. Gently straighten any kinks with your fingers. If the tubing has developed a permanent crease, it should be replaced — a creased section can re-kink even after straightening.
- Step 4 — Verify pump operation: Refill the reservoir, plug the unit in, and start a cycle. Place your fingertip lightly on the pump housing (accessible through the reservoir opening on most Euhomy models). You should feel a distinct vibration within the first 30 seconds of the cycle. No vibration at all points to an electrical issue or a seized pump. A vibration with still no cascade suggests an obstruction between the pump outlet and the distribution tray.
- Step 5 — Clean the distribution tray: If the pump is running but water still is not reaching the fingers, remove the distribution tray according to your model’s instructions and flush it with warm water and diluted white vinegar to clear any scale deposits from the outlet holes.
When to Replace the Pump vs. When It’s a Simpler Fix
If cleaning the intake screen and clearing the tubing restores normal cascade flow, you have solved a maintenance issue, not a mechanical failure — no parts replacement is needed. However, if the pump produces no vibration during a cycle, vibrates but makes a grinding or rattling noise, or runs continuously without ever generating sufficient flow even with a clean screen and clear tubing, the pump impeller is likely seized or the motor windings are damaged. This is the point where an euhomy ice maker water not cascading problem crosses from a DIY cleaning fix into a component replacement. Euhomy replacement pumps are available directly from the manufacturer’s support line and from several third-party appliance parts suppliers; the part is typically inexpensive, and replacing it requires only a Phillips screwdriver and basic comfort with disconnecting push-fit tubing connectors. If your unit is still within its warranty period, contact Euhomy customer support before purchasing a replacement part, as a pump failure under normal use conditions may be covered at no cost to you.


