
Fuse Replacement — Dead Microwave on BLACK+DECKER EM720CB7
The BLACK+DECKER EM720CB7 countertop microwave uses multiple fuses to protect its electrical circuits from power surges and component failures. When your microwave suddenly stops working with no display, lights, or sounds, a blown fuse is often the culprit. The most common failure point is the main line fuse, typically a 20-amp ceramic fuse located near the power cord entry point. This repair is considered MODERATE difficulty due to the need to disassemble the outer casing and work around high-voltage components, but with proper safety precautions, most home repair enthusiasts can complete this task successfully.
Symptoms
- Microwave is completely dead with no display lights or sounds when plugged in
- Digital clock and control panel are completely dark on the BLACK+DECKER EM720CB7
- No response when pressing any buttons on the control panel
- Interior light does not illuminate when door is opened
- Turntable motor shows no movement or attempt to rotate
- Unit worked normally, then suddenly stopped during operation or after a power outage
⚠️ Safety Warning
CRITICAL SAFETY NOTICE: Microwaves contain a high-voltage capacitor that can retain a lethal charge (up to 4,000 volts) even when unplugged for extended periods. Before beginning any work on your BLACK+DECKER EM720CB7, disconnect power for at least 30 minutes, then discharge the capacitor using an insulated screwdriver across its terminals while wearing rubber gloves. Never work on a microwave alone, and ensure someone knows you are performing this repair. High voltage can cause severe injury or death. The magnetron and transformer also present high-voltage hazards. If you are uncomfortable working with electrical components, contact a professional repair service immediately.
Parts Needed
- Main Line Fuse: 20A 250V ceramic fuse (BLACK+DECKER part #EM720CB7-FUSE-MAIN or equivalent Littelfuse 5KT series)
- Secondary Control Fuse: 15A 250V ceramic fuse if applicable (part #EM720CB7-FUSE-SEC)
- Thermal Cutoff Fuse: Temperature-rated thermal fuse 184°F/85°C if damaged during inspection
- Electrical contact cleaner spray
- Dielectric grease for fuse holder connections
Tools Required
- Phillips head screwdriver (medium size #2)
- Flathead screwdriver with insulated handle
- Digital multimeter with continuity testing capability
- Needle-nose pliers with insulated handles
- Work gloves (rubber insulated preferred)
- Flashlight or headlamp for interior visibility
- Anti-static wrist strap (recommended)
Step-by-Step Instructions
Step 1: Power Disconnection and Capacitor Safety
🔨 Pro Tip from Dave
Here’s something that trips up a lot of DIYers: even after a fuse blows from a power surge, always test the door interlock switches before you button everything back up — on this model, a faulty interlock switch is frequently what caused the fuse to blow in the first place, and if you skip that check, your brand-new fuse will blow again the moment you plug it in. A quick continuity test on each door switch takes two minutes and will save you a second disassembly.
Unplug the BLACK+DECKER EM720CB7 from the wall outlet and wait a minimum of 30 minutes for the high-voltage capacitor to discharge naturally. Remove any items from the microwave interior and ensure the unit is positioned on a stable work surface. Locate the capacitor (cylindrical component near the magnetron) and carefully discharge it by touching an insulated screwdriver across both terminals simultaneously while wearing rubber gloves. You should see a small spark if any charge remained.
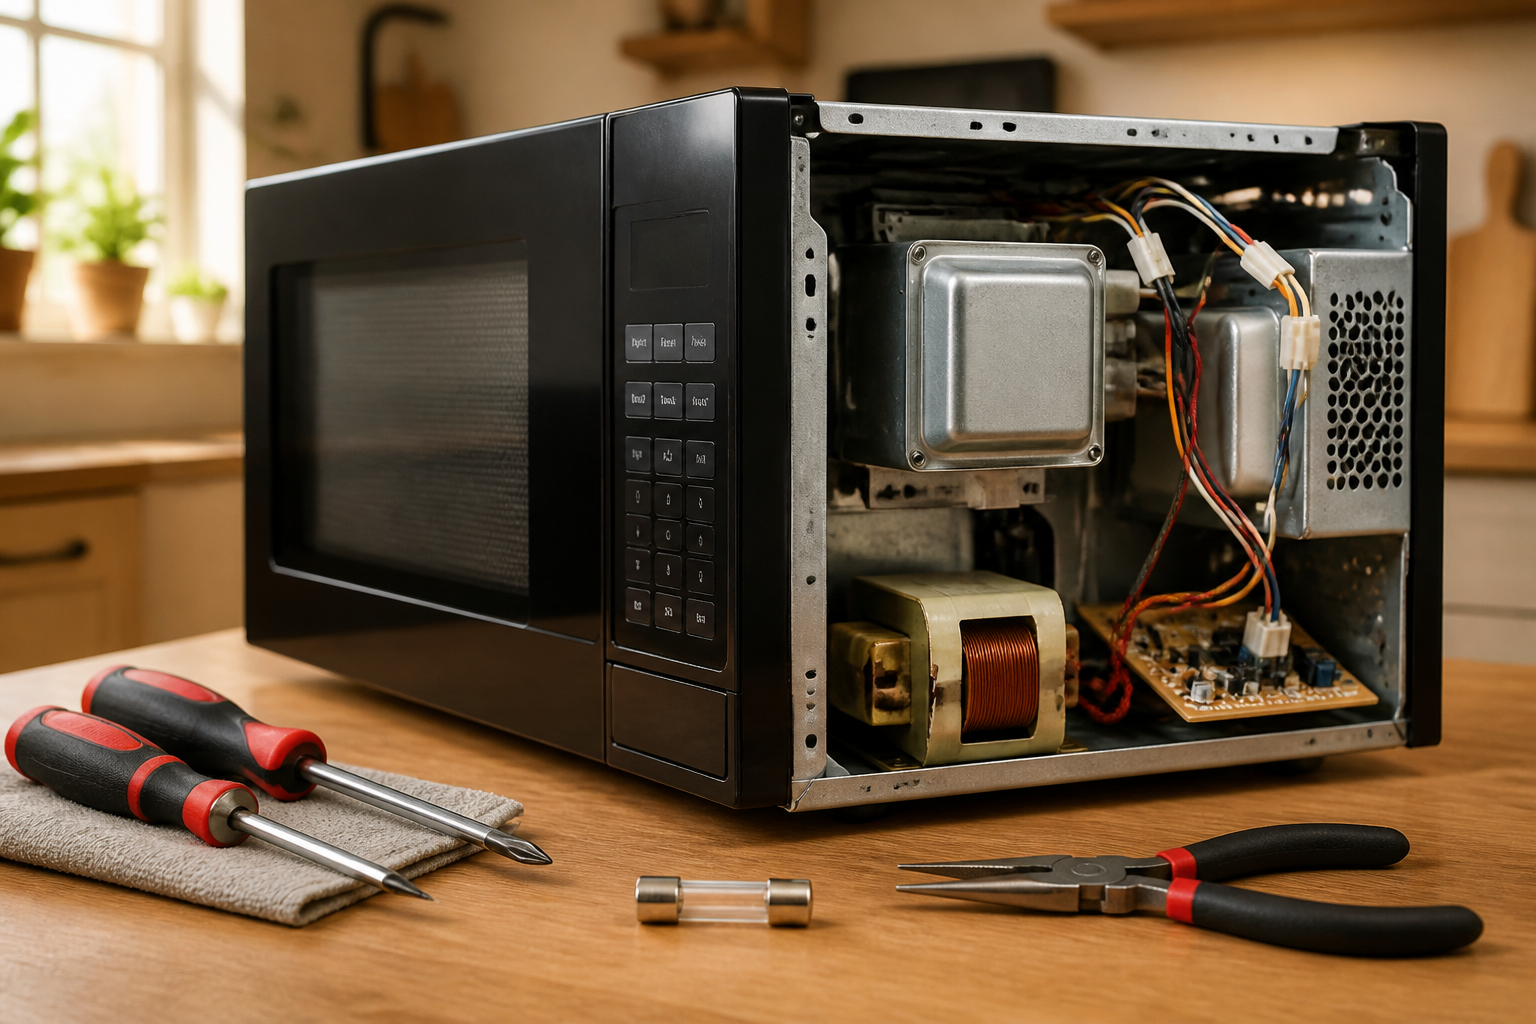
Step 2: Remove Outer Casing
Remove the six Phillips head screws from the back panel of the BLACK+DECKER EM720CB7: four screws along the top edge spaced approximately 3 inches apart, and two screws on the bottom corners. Remove two additional screws from each side panel, located 2 inches from the rear edge. Carefully slide the outer metal casing toward the back of the unit approximately 1 inch, then lift it straight up and off the microwave frame.
Step 3: Locate the Main Fuse Assembly
With the casing removed, locate the main fuse holder on the right side of the BLACK+DECKER EM720CB7 internal frame, approximately 4 inches from the front panel and 2 inches below the top edge. The fuse will be housed in a black plastic holder connected to heavy gauge wires coming from the power cord entry point. Note the wire colors: typically black (hot) and white (neutral) wires connect directly to this fuse assembly.
Step 4: Test the Suspected Fuse
Before removing any components, set your multimeter to continuity mode and test the fuse while still installed. Touch one probe to each end of the fuse terminals visible through the holder. A good fuse should show continuity (beep or near-zero resistance reading). No continuity indicates a blown fuse. Additionally, visually inspect the fuse through any transparent portions of the holder for blackened glass or broken internal filament.
Step 5: Remove the Fuse Holder
Disconnect the wire connectors attached to the fuse holder by gently pulling the spade terminals straight off. These connectors may be tight, so use needle-nose pliers if necessary while supporting the fuse holder with your other hand. Remove the fuse holder from its mounting bracket by either pulling it from spring clips or removing the single mounting screw, depending on your specific BLACK+DECKER EM720CB7 production date.
Step 6: Extract and Inspect the Blown Fuse
Open the fuse holder by either unscrewing the cap or pulling apart the two-piece holder. Remove the ceramic fuse carefully and examine it closely. A blown fuse will show obvious signs: blackened or clouded ceramic body, broken metal caps, or visible gap in the internal wire element. Measure the fuse length (typically 1.25 inches for this model) and confirm the amperage rating printed on the side (20A for main fuse).
Step 7: Check for Root Cause Issues
Before installing the replacement fuse, inspect the wire connections and surrounding components for signs of overheating, corrosion, or damage that may have caused the original fuse failure. Check the door switches, magnetron connections, and transformer for obvious burn marks or loose connections. Clean any corrosion from the fuse holder terminals using electrical contact cleaner and a small brush.
Step 8: Install the New Fuse
Insert the new 20A ceramic fuse into the holder, ensuring it seats fully against both end contacts. Apply a thin layer of dielectric grease to the fuse holder terminals to prevent corrosion. Reassemble the fuse holder by screwing the cap back on or clicking the two halves together firmly. The fuse should be held securely with no rattling or loose movement.
Step 9: Reconnect the Fuse Assembly
Mount the fuse holder back into its bracket on the BLACK+DECKER EM720CB7 frame, ensuring proper orientation with terminals accessible for wire connections. Reconnect the wire spade terminals firmly onto the fuse holder posts, matching the original wire positions (typically black wire to the line side, white wire to the load side). Verify all connections are tight and properly seated.
Step 10: Perform Continuity Test
With the new fuse installed and connected, use your multimeter to verify continuity through the complete circuit path from the power cord through the fuse to the main control board connections. You should read continuity (near zero ohms) through the fuse path. Also test that there are no short circuits between the hot and neutral lines (should show no continuity).
Step 11: Reassemble the Microwave Casing
Carefully position the outer metal casing back onto the BLACK+DECKER EM720CB7 frame, ensuring all internal wires are clear of pinch points. Slide the casing forward until it aligns with the front control panel. Replace all screws in reverse order: two side panel screws on each side, then the six rear panel screws. Ensure all screws are snug but do not overtighten to avoid stripping the metal.
Step 12: Test Operation
Plug the microwave back into the electrical outlet and verify that the display illuminates and shows the correct time or default display. Test basic functions by opening and closing the door (interior light should operate), setting a short timer (30 seconds), and running a brief heating cycle with a microwave-safe cup of water. Listen for normal operation sounds including turntable rotation and magnetron humming.
Troubleshooting
- If the new fuse blows immediately upon plugging in, check for short circuits in the door switch assembly or damaged wiring harness near the door hinge area of the BLACK+DECKER EM720CB7
- Display lights up but microwave won’t heat: Check the secondary fuses near the control board and verify magnetron thermal fuse continuity
- Intermittent operation after fuse replacement: Inspect all wire terminals for looseness and verify proper fuse holder mounting
- Strange noises or arcing during operation: Immediately disconnect power and inspect waveguide cover and magnetron antenna for damage
- Control panel functions erratically: Check for moisture infiltration in the control board area and verify ribbon cable connections
- Fuse replacement doesn’t restore any functions: Test voltage at the main power input terminals and verify proper grounding connections
When to Call a Professional
- Multiple fuses continue to blow after replacement, indicating deeper electrical problems requiring specialized diagnostic equipment
- High voltage components like the magnetron or transformer show signs of failure or damage during your inspection
- You discover evidence of arcing, burning, or melted components anywhere inside the BLACK+DECKER EM720CB7
- You are uncomfortable working around high-voltage electrical components or lack experience with appliance repair safety procedures
When to Call a Professional
Most of the repairs in this guide are within reach for a careful DIYer with basic tools. In my experience, if you pull that main line fuse and it tests good, or if you’ve already replaced the fuse and the microwave still won’t power on, stop there and call a certified technician — because at that point the fault has likely moved into the magnetron, the high-voltage capacitor circuit, or the control board, and those components involve voltages that can be lethal even when the unit is unplugged. When in doubt, a diagnostic service call typically costs $80–$120 and can save you from a misdiagnosis that costs more in parts.
Recommended Parts & Tools
20A 250V Ceramic Microwave Fuse – Fast Blow 6.3x32mm
This ceramic fuse is the most common replacement for BLACK+DECKER EM720CB7 microwave ovens when the unit completely loses power. The 20 amp, 250 volt fast-blow fuse matches the original specifications and will restore your microwave to working condition once installed. Check current pricing on Amazon.
Insulated Screwdriver Set with Phillips and Flathead
These insulated screwdrivers are essential for safely accessing the fuse compartment in your BLACK+DECKER EM720CB7 microwave without risk of electrical shock. The insulated handles provide protection while removing the outer cover and fuse holder to complete your repair. Check current pricing on Amazon.


