Door latch not latching
This guide walks you through diagnosing and repairing a door latch that won’t latch on the KitchenAid KDPM604KPS built-in dishwasher. We cover everything from identifying the root cause to installing a replacement latch assembly, and most homeowners with basic mechanical skills can complete this repair in 1 to 2 hours without professional help.
Common Symptoms & Causes
A failing door latch on the KDPM604KPS typically presents in several recognizable ways before it stops working entirely.
- The door closes but the cycle will not start because the latch switch never signals the control board
- The door feels loose or bounces open slightly during a wash cycle
- You hear a click when closing the door but the latch does not hold
- The dishwasher displays an error or simply shows no response when the start button is pressed
The most common root cause is a worn or broken door latch strike assembly, though a faulty door latch switch that fails to send a closed signal to the control board is a close second.
Safety First
- Unplug the dishwasher from the wall outlet or switch off the dedicated circuit breaker before starting any work
- Wear cut-resistant work gloves because dishwasher door panels have sharp metal edges
- Photograph all wiring harness connections before disconnecting anything so you can reassemble correctly
- Work in a well-lit space and use a headlamp or portable work light inside the door cavity
Tools & Parts Needed
Essential Tools
- T20 and T25 Torx screwdrivers
- Phillips #2 screwdriver
- Flathead screwdriver for prying wire clips
- Multimeter for testing latch switch continuity
- Needle-nose pliers
Replacement Parts
Step-by-Step Repair Instructions
🔨 Pro Tip from Dave
On the KDPM604KPS, the latch assembly uses a plastic retaining tab that’s notorious for cracking during removal if you pry from the wrong side — always release it from the left side first using a flat spudger, not a screwdriver, or you’ll break the new part before it’s even installed. I’ve seen techs order a second latch assembly on the same job because they didn’t know that.
Step 1: Disconnect Power and Empty the Dishwasher
Unplug the unit or trip the circuit breaker and remove all racks so you have clear access to the door interior. Confirm power is off by pressing the Start button — no lights or sounds should appear. Skipping this step risks electric shock when you disconnect the latch switch wiring.
Step 2: Remove the Inner Door Panel
Open the door fully and remove the Torx T20 screws running along the inner door perimeter — typically eight to ten screws on the KDPM604KPS. Carefully lift the outer door panel away from the inner panel and set it aside without straining the wiring harness. If the panels resist separation, check for any hidden clips along the bottom edge.
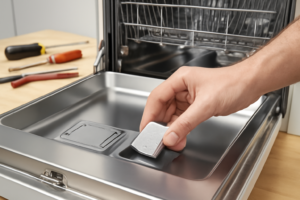
Step 3: Locate and Inspect the Latch Assembly
The latch assembly sits at the top center of the inner door panel and is held by two or three Phillips screws. Visually inspect the plastic latch body for cracks, broken tabs, or a worn hook that no longer catches the tub strike. A latch that visibly flexes without engaging the strike is confirmed faulty.
Step 4: Test the Door Latch Switch with a Multimeter
Disconnect the wiring harness from the latch switch and set your multimeter to continuity mode. Press the latch actuator manually and probe the switch terminals — a good switch shows continuity when pressed and open circuit when released. No continuity change in either position confirms the switch has failed and must be replaced.
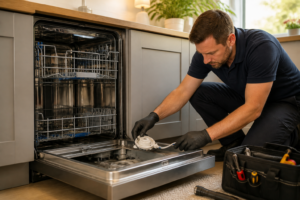
Step 5: Replace the Latch Assembly or Switch
Remove the mounting screws and pull the old latch assembly free, then disconnect the wiring harness connector. Snap the new latch assembly into position, secure the mounting screws snugly without over-torquing the plastic housing, and reconnect the wiring harness until it clicks. If only the switch failed, many assemblies allow you to swap just the switch module.
Step 6: Inspect and Adjust the Door Strike
Examine the strike bracket mounted on the dishwasher tub opening — it should be centered and sit flush with no bends or cracks. If the strike is misaligned, loosen its mounting screws and shift it slightly until the new latch hook engages smoothly. A strike that is bent or cracked should be replaced with part W10823377 to prevent repeat failures.
Step 7: Reassemble and Test
Reattach the outer door panel, reinstall all Torx screws in reverse order, and restore power. Close the door firmly and listen for a solid click, then press Start — the dishwasher should begin filling immediately. Run a short cycle and verify the door stays sealed throughout without popping open.
How Much Does This Repair Cost?
Doing this repair yourself typically costs between $20 and $65 in parts depending on whether you need only the switch, the full latch assembly, or the strike bracket as well. A professional service call for the same repair on a built-in dishwasher generally runs $150 to $300 once you factor in the trip charge, labor, and marked-up parts. Tackling it yourself puts roughly $100 to $250 back in your pocket and takes less than two hours.
Where to Buy Replacement Parts
You can order all three parts directly through Amazon for fast delivery. Search for the exact part names below to find compatible options for the KitchenAid KDPM604KPS:
- KitchenAid KDPM604KPS door latch assembly replacement (WPW10619760)
- KitchenAid KDPM604KPS door latch switch replacement (WPW10195091)
- KitchenAid KDPM604KPS door strike bracket replacement (W10823377)
When to Call a Professional
Most of the repairs in this guide are within reach for a careful DIYer with basic tools. In my experience, if you’re finding that a brand-new latch assembly still won’t engage after confirming correct installation and strike alignment, that’s a strong indicator of a warped inner door panel or a bent tub frame — a structural issue that requires hands-on assessment and specialized straightening tools that go well beyond a standard DIY repair. When in doubt, a diagnostic service call typically costs $80–$120 and can save you from a misdiagnosis that costs more in parts.
Frequently Asked Questions
Before you start disassembling anything, make sure you have the right replacement part on hand — the door latch is the most common culprit when your KitchenAid KDPM604KPS won’t latch shut. The PartsBroz WPW10653840 Door Latch – Compatible With Whirlpool Kenmore KitchenAid Maytag Dishwasher – Replaces AP6023622 W10653840 3281753 PS11756967 W10574864 Ultra Durable Replacement is a direct-fit option that crosses multiple OEM part numbers, so you can be confident it’ll work with your machine. It’s a cost-effective aftermarket choice that gets your dishwasher back up and running without waiting on a service technician. (As an Amazon Associate I earn from qualifying purchases.)
If you’ve confirmed the latch mechanism is the problem and you prefer to go straight to an OEM part, the W10862259 Dishwasher Door Latch and Handle Assembly Genuine OEM is worth considering, as it includes the full handle assembly — useful if your handle feels loose or damaged alongside the latch failure. Installing a genuine OEM component means you’re matching the exact specs the manufacturer built the KDPM604KPS around, which can matter for long-term reliability. Drop this in during reassembly and you’re essentially restoring the door mechanism to factory condition.
If you want a domestically sourced aftermarket option before wrapping up this repair, the US-Based Supplier – WPW10653840 Door Latch