TrueSteam not working
This step-by-step repair guide walks you through fixing truesteam not working on your LG LDTH7972S. With the right tools and parts, most homeowners can complete this repair in 1–2 hours and avoid a costly service call.
🔨 Pro Tip from Dave
On the LG LDTH7972S, don’t overlook the steam generator part number AEW73110101 before assuming the water inlet valve is bad — techs frequently misdiagnose this. A hidden gotcha on this model is mineral scale buildup inside the steam nozzle tube; flush it with white vinegar before replacing any parts, or you’ll find the new generator fails just as fast.
Part of our Top 20 Dishwasher Models & Common Repair Issues Guide. Browse all dishwasher repair guides for related models and issues.
“`html
Common Symptoms & Causes
The following symptoms often indicate that the TrueSteam function has failed on your LG LDTH7972S dishwasher.
- Dishes come out wet or without the usual steam-dry finish
- The TrueSteam indicator light flashes but no steam is produced during the cycle
- A burning or dry-heat smell occurs where steam should be released
- The dishwasher completes its cycle but the interior remains cold to the touch
These issues are most commonly caused by a failed steam generator, a clogged or burned-out heating element, or a faulty water inlet valve that prevents water from reaching the steam system.
“`
Safety First
- Unplug the dishwasher from the power outlet before starting any repair — never work on a live appliance.
- Shut off the water supply valve before disconnecting any water lines or hoses.
- Wear work gloves when handling metal brackets, sheet metal edges, or sharp components.
- Take photos with your phone before disconnecting any wiring harnesses or connectors.
- Work in a well-lit area with enough floor space to lay removed panels flat.
Tools & Parts Needed
Essential Tools
- Phillips #2 screwdriver
- Torx T20 screwdriver
- Needle-nose pliers
- Multimeter
- Flashlight
Replacement Parts
- Steam heater assembly
- steam nozzle
- white vinegar
- multimeter
Step-by-Step Repair Instructions
Step 1
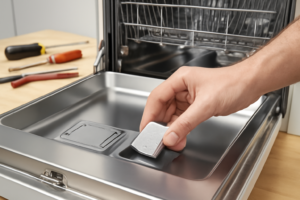
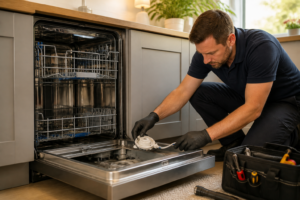
Disconnect power at the breaker before doing anything else — working near water and heating elements is a shock hazard. Remove the lower rack to expose the steam nozzle, a small port at the lower-left corner of the tub interior. Inspect it closely for whitish mineral scale buildup, which is the most common reason TrueSteam stops producing steam entirely.
Step 2
Pour 1 cup of white vinegar directly into the tub bottom and let it sit for 20 minutes — the acetic acid dissolves calcium and magnesium deposits that can fully seal the nozzle opening. This is worth doing before any disassembly, since most TrueSteam failures on hard-water installs are solved here. After soaking, run a Rinse cycle to flush loosened deposits out of the nozzle and drain path.
Step 3
If the nozzle still looks blocked or you can see a physical crack, remove it by backing out the single Phillips screw that secures it to the tub wall. Use a toothpick to clear the port opening, then soak the nozzle in vinegar for 20 minutes before reinstalling — do not use metal tools inside the nozzle, as they can widen the orifice and reduce steam pressure. If the nozzle body is cracked, replace it with the OEM part rather than reinstalling a damaged one.
Step 4
If descaling did not restore steam, the steam heater element itself may have failed — a common result of prolonged scale buildup that causes the element to overheat and burn open. Tilt the unit back carefully to access the base and locate the heater assembly under the sump. Set your multimeter to Rx1 and probe the element terminals: a reading of 15–30 Ω is healthy; an open reading (OL) means the element assembly must be replaced.
Step 5
With the heater assembly still accessible, test the steam inlet solenoid, which controls water flow into the steam heater — if it won’t open, the heater never receives water and produces no steam regardless of element condition. Unplug the 2-pin harness on the steam heater module and probe the solenoid terminals on Rx1; you are looking for 200–500 Ω. A reading of OL (open circuit) confirms a failed solenoid and the module should be replaced.
Step 6
Restore power at the breaker and run a Heavy wash cycle with TrueSteam selected. Watch through the door — visible steam should appear inside the tub within 5 minutes of the cycle starting; if it takes longer or never appears after replacing components, recheck all harness connectors on the steam module for secure seating before suspecting a control board fault.
Where to Buy Replacement Parts
Find genuine OEM and aftermarket replacement parts for your LG LDTH7972S on Amazon:
- LG LDTH7972S steam heater assembly ADW82018102 replacement
- LG dishwasher TrueSteam generator nozzle clog
- LG dishwasher steam module descaling vinegar
When to Call a Professional
If the issue persists after completing all steps above, the problem may involve the sealed refrigerant system, a failed main control board, or wiring that requires specialized diagnostic equipment. Contact a licensed appliance technician — attempting sealed-system repairs without EPA 608 certification is illegal and unsafe.
How Much Does This Repair Cost?
DIY repairs for TrueSteam issues on the LG LDTH7972S typically cost between $10–$65 in replacement parts, such as a steam generator or solenoid valve. A professional service call generally runs $150–$300 once you factor in labor and diagnostic fees. Tackling this repair yourself can save you $100 or more.
Frequently Asked Questions
Why is the TrueSteam function not producing any steam on my LG LDTH7972S?
The most common cause is a clogged or faulty steam generator, often due to mineral buildup from hard water. Running a cleaning cycle or descaling the unit typically resolves the issue.
Is it safe to run the LG LDTH7972S without TrueSteam while I wait for repairs?
Yes, the dishwasher will still operate normally for standard wash cycles without the steam function. Simply avoid selecting steam-dependent settings until the issue is fixed.
Do I need a professional technician to fix the TrueSteam system?
Basic fixes like descaling or checking water supply connections are DIY-friendly. However, if the steam generator needs replacing, hiring a certified appliance technician is recommended.
Recommended Products
These are the parts and tools we recommend for this repair, based on compatibility and customer reviews:
- LG AEQ73110205 Genuine OEM Ice Maker Assembly for LG Refrigerators, White
- LG AEQ73110205 Ice Maker Assembly, Kit
- LG Electronics AJU72992601 Refrigerator Water Inlet Valve
- 5221ER1003A 5220FR2075L Water Inlet Valve Replacement for LG Tromm & Ken.more Front Load Washers – Replaces 5221ER1003C 5221ER1003D Assembly by TOMOON
As an Amazon Associate, I earn from qualifying purchases.